
And mostly the hate bit wins as I do tend to avoid it if possible - I mean I'd rather hand stitch something than paper piece it.
I always seem to make a mistake or two. The shorter stitches used mean that it is a lot harder to unpick. Stitching through paper must blunt my needle. And then you have to rip the paper off! It makes a big mess!
But on the plus side it does make things a whole lot more accurate than without the paper template which is why I would hand piece instead for greater accuracy!
At the thread house retreat I was stitching my own thing instead of joining in Lynne Goldsworthy's paper piecing class but I finished my project quickly and started using her template to make her stunningly beautiful block - but it didn't manage to finish it there.

When I got home I thought I should finish it. And I did! I was using fabric received in the retreat goody bag (which was excellent by the way) and raffle ; two charm packs from moda fabrics, mixed bag 2017.
I thought I'd make some more but didn't want to go with paper piecing....so I tried out something a bit different.
I had heard about this technique using freezer paper and here is how it goes...
First trace your pattern onto freezer paper or print it (haven't tried that but several people say it is ok to do)

Now apply the wrong side of your first fabric to the waxy side of your freezer paper pattern using your iron to heat the wax coating. Then fold back the freezer paper along your seam line and trim your fabric to 1/4" seam allowance. In this case I am making an irregular hexagon (thanks @archiewonderdog)

Do this on all sides - this will make it easier to line up your next fabric and use the minimum amount.
Check your next piece of fabric is large enough to cover the pattern - in this case the corner triangle and your seam allowance. Place fabric with right sides together, folding back the freezer paper along the seam line.

With the freezer paper still folded back stitch the seam. You are using the paper to guide your stitching and NOT stitching on the paper.

Now you fold down the paper and iron to fabric.

Here is the view from the front...

Repeat for the next piece - front view

View from the back - look no stitching on the paper! Use the pattern to trim off excess fabric back to the seam allowance.

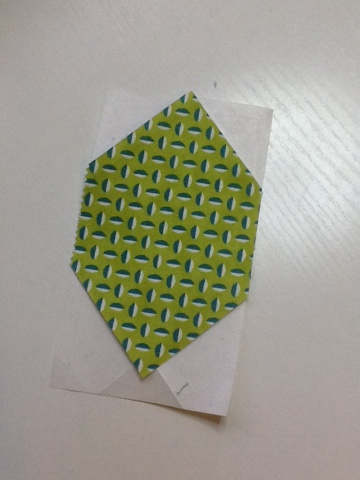
Here is the final unit all trimmed with the freezer paper pattern still in place

Peel off the freezer paper template and reuse for next piece - I used this freezer paper pattern for each piece like this in the three stars I made this way - that is twelve times! I made each piece of this star pattern using just two freezer paper patterns then once trimmed the fabric units were easily pieced together as normal with a 1/4" seam and no paper in the way.

Another advantage of this method is that you can press your seams in any direction you like or press them open if you prefer just by peeling the paper back sufficiently to allow this. Some of these seams are a bit uppity as I didn't press them enough!

It was quicker for me, less messy, less stressy! I think I may be beginning a love love relationship with this method of paper piecing. Have a go and see what you think!


wHAT IS THE PATTERN THAT YOU ARE USING FOR THE STARS?
ReplyDeleteCarol - you haven't left your email so I am replying here! Lynne says her pattern for the star block will be coming out in the magazine Love Patchwork and Quilting sometime this year but she is not sure when. Her quilt pattern will be different from the quilt pictured here, which is something I made up using her block design.
DeleteGreat tutorial, I must get round to giving it a try! I love the top you've made with the goody bag/raffle charm packs!
ReplyDeleteThanks. I've never tried this way before. I have printed onto freezer paper and it works fine.
ReplyDeleteThank you, this was a great tutorial. I never paper piece, because I hate to tear away the paper. Have to try this method.
ReplyDeleteThanks for sharing this method.
ReplyDeleteI pre fold all the crease lines I shall be using, before I start applying fabric. I find this makes my life much easier. Nice crisp folds that fold where you want them, without stretching the fabric while fighting it!
ReplyDeleteAnd the main bits I hate about FPP are the tearing off paper after, and the waste! This makes me so much happier on all counts!
PS, I tried printing on the freezer paper, but I have a lasetr printer- It gets too hot and the freezer paper got stuck to the roller inside.... not the best plan! A printer that doesn't send out the printed item positively HOT would work fine, though!
ReplyDeleteOh I love love love the block. I too wanted the pattern!!!!
ReplyDeleteThanks for sharing how you did this. I enjoyed seeing these blocks coming together on IG and didn't really understand how to use freezer paper for paper piecing. (I had also forgotten that I wanted to know how to do this so reading blogs late has it's advantages!!)
ReplyDelete