Tuesday 21 May 2019


I had a mini show of quilts donated to Siblings Together back in November but this time we are going it alone!

It would be great to have as many people as possible come along, enjoy the quilts and meet up.

Hope you will join us 

Wednesday 8 May 2019

MINI BLOCK DRIVE - MAY, JUNE, JULY 2019


Hi everyone, it’s time for the next round of the mini block drive, this time with Kate (@timetosew on Instagram). For the next few months we will be looking at two blocks:

Half Square Triangles (HSTs) 
Snowball blocks

Quilt inspiration 
There is lots you can do with just HSTs and Snowball blocks. We hope to be able to make up different quilt top designs depending on how many blocks are made. In the meantime, here’s some inspiration:

Caption: (L) Indian Summer quilt, (R) Lake Michigan Quilt, both patterns by Suzy Quilts


Caption: Fractals by Jeni Baker, and vintage snowball quilt (image from @allpeoplequilt)


Caption: (L) Mexican tile quilt from cloud 9 fabrics, and (R) variation on a snowball quilt by Suzy Quilts


BLOCK DETAILS

Unfinished size: HSTs unfinished can be 6 ½ inch or 3 ½ inches. Snowball block unfinished size is 6 ½ inches. Please leave all blocks untrimmed. 
Colour: white, off white. Prints are fine as long as the fabric still reads as white. No cream please. For the colours, I’d like mainly blues and yellows, but it can be anything you want as long as it is bright and happy. See the pictures for some inspiration.
For the snowball block, the centre can be the white or colour, I don’t mind. How many: as many as you want to make! If you have big squares of fabric you can make 4 or 8 HSTs at a time. 
Where to post: send me a message on Instagram @timetosew or email kate@timetosew.uk for the address


Colour inspiration: 


HSTs - How to make 

For two at a time 

Cut a square of white and a square of colour, each 7” size (for the large HSTs) or 4” (for the small HSTs) and place right sides together. 
Draw a diagonal line from corner to corner and sew with scant ¼ in seam allowance on both sides of the line. 
Cut on the diagonal line
Press seams to the colour side.


For eight at a time (see pictures):
Cut a square of white and a square of colour 14” (for the large HSTs) or 8” (for small HSTs) and place right sides together. 
Draw guidelines: along both diagonals, then vertically and horizontally on the halfway points. You can see mine in blue chalk. 
Sew ¼ inch on both sides from the blue diagonal chalk lines (4 lines of stitching in total).
Cut on all the blue chalk lines, press seams to the colour side.

Steps 2 and 3


Step 4 / finished blocks


Snowball block - how to make (refer to picture)

Cut one 6 ½ inch square of the white and four 2 ½ inch squares of colour (or cut a large colour square and 4x small white squares).
Put a small square on each corner, right sides together. 
Sew a diagonal line through the corners.
Press along the diagonal line
Trim corners with a ¼ in seam allowance and press back to get the finished corner.


Finished block

Thursday 21 March 2019

The Furtling that happened in March

Archie The Wonder Dog


Mini Archie is ready with his furtling stick I’m sure so I’m trying to be really ready this time.

There was the second session of Horsham Stitchers at the beginning of the March, where I was thrilled to meet to lovely ladies and gather quilts from some of them for Siblings Together.   It was my first time meeting Sue Blake and Suzanne Foster.

Here are the wonderful quilts they brought


We had two beginners come along and I put them to work making the blocks that Trudi and Viv have requested for the #miniblockdrive just five colour graded 2 1/2” strips, 10 1/2” long, making a 10 1/2” square block...and here they are


Also my eldest daughter has taken to cross stitch and finished off this cute foxgloves kit 


I haven’t been idle either - I’m up to date with putting all the Friendship star blocks I’ve received together.  It’s a real community project and it will be going to Festival of Quilts to show our quilting community just how marvelous you people are making quilts for Siblings a Together.  See next photo bottom right...

And then having sorted out a lot of donations I managed to finish three quilt tops - Clockwise from top left:  Framed stars (due to a mistake in cutting at night ....don't ask !!) ; A top made from Karen Lewis orphan blocks and some Kona Thistle I added in the background; #expandinguniversequilt; and a scrappy strip top...


I also volunteered to do a demo of hand quilting at my local fabric shop, Closs & Hamblin, in exchange for some publicity later in the year for another quilt show of Siblings Together quilts - more on that later.

I was a bit worried beforehand as I don't think I have good teaching skills but in the end I just talked (I can do that forever) and invited people to Horsham Stitchers and also spoke about Siblings Together.  I met lots of crafters who don't do patchwork...yet!

As my demo I decided to hand quilt my snowdrop Hawaiian block which was of interest to many.


This is how far I got on....


I'm loving all that texture.... I'm getting quite into it I have to say and really want to see it finished - I wasn't sure if I should make this a quilt ( the pattern is from www.poakalani.net and there is a calendar of designs available free of charge) or a cushion cover....the jury is still out but it may be something to pick up and do from time to time with the other flower patterns....

So that was my month - what about yours?  
Do link up with the lovely Helen and let's all have a furtle along the blogosphere!


Wednesday 6 March 2019

Furtling time !

Hello all you fellow furtlers!

If you are not a furtler yet then please join up with Archie the Wonder Dog and enjoy the fun.

Mini Archie is waiting with a pointy stick in case you are tardy.....speaking of which I’d better address my very own bit of furtling...

After I came back from Thread House Retreat I managed to catch the flu and just stayed in bed and didn’t do much at all.  But I seem to have regained my energy now and have been busy in the sewing room and here is what I’ve done...


February started off with a new stitching club I set up in Horsham - Horsham Stitchers

,


There were nine of us !   And this weekend I enjoyed another session - a few different people came and a few with a Siblings Together connection, which I’m thrilled about as they brought wonderful quilts to donate to the charity - from Sue Blake and Suzanne Foster.


I finished off making this top for Siblings Together with help from my #STQB mates - it was a really easy block made from two fabrics - a print and a solid


Thursday 31 January 2019

Furtling thoughts and plots


My dear dear friend Helen is starting  up a links page for blogs to encourage us to read blogs, write blogs and socialise in general.  It’s a crafty blog sort of a thing ...write about your craftiness done during the past month or look forward to your plans for the coming month and link up  - then review at the next link up.  She will be ably assisted by her tiny friend mA and he will be keeping a sharp eye out for any slackers that need a bit of a prod with a pointy stick to get going...

Archie The Wonder Dog


Indeed I feel a bit of a prickle at the back of my neck ....wondering if that could possibly be him?

Today I’ve been a bit distracted - while feeling ill I’ve been watching back to back episodes of Marie Kondo’s show on decluttering and so I suddenly decided to start tidying up my sewing room today.


I’ve emptied a whole lot of stuff into the lounge - now the whole house is in turmoil!  But part of my sewing room is beginning to look great.

I’ve taken down one design wall and moved it so I can hang up a little quilt hanging I’ve had for ages but no wall space to put it up.


I made this hanging with help from my first ever bee - Sew and Bee Happy.   It was an attempt to work out my making process so has words and images associated with those words and quite good FMQ if I may say so?  A lot better than anything I can do now anyway....


Monday 31 December 2018

January Mini Block Drive for Siblings Together will be going to Festival of Quilts - want to come?


Having entered two quilts into last year's festival of quilts and having seen some of the community quilts there I started hatching a plot for Siblings Together Quilt Group to join in the fun!

It is scary putting your work out there but both my quilts were joint ventures so I was not alone and I thought that would be an excellent way for others to put their work forward.

So here is my idea - I am the mama for the January #miniquiltdrive for the #100quiltsforsiblingstogether  campaign.  So instead of asking for lots of blocks I am looking for just ONE 6" finished Friendship Star block from everyone who has ever been involved in making quilts for Siblings Together.  Whatever you have done and whenever it was I'd love as many of us to be represented in this quilt.

I hope you would all love to join in - in fact I'm counting on it!  It will be a very small quilt otherwise.

So here is the block - a 6" finished Friendship Star block


You may have seen my photos on Instagram 


Here is the tutorial:

Cut five 2 1/2" squares - one is the centre square in a light colour.

Please write your first name on this centre square in a pen that will not wash out.  Let's make it easy to read so not your most undecipherable signature!  

Tip:  I did this before any sewing so I was happy with the result and didn't have to unsew due to unsightly wiggles - if you don't like your writing you can ask someone else to or send to me if you don't have a suitable pen, just make sure I know who you are!!

The other four 2 1/2" squares are the background, which can either be light or dark as seen below.


Make four 2 1/2" HST (half square triangles) in your preferred method - they can all be made from two fabrics (star and background) or be scrappy but best if the stars points are all in a similar colour and background fabrics too so the star will stand out.  


In my example below I have used all the same solid for the background and the star triangles in two fabrics


Assemble all HSTs and squares in a nine patch as shown above or you can spin that star the other way if you prefer - I am looking for a mixture of dark/light backgrounds and clockwise and anti-clockwise spinning stars!


Stitch the squares together in each row.


Press the seam allowance in alternate directions in each row to nest those seam allowances when joining rows.


 The finished block - from the front


from the back...


Just contact me Nicky Eglinton on IG or nickyeglinton@aol.com for my address and I hope to see you at Festival of Quilts in front of our quilt!


How to make the HST blocks:

Cut four 3" squares - two in background fabrics, two in star fabrics.

Draw a diagonal line across the back of the squares.  Pair up a background with a star fabric, right sides facing.  Stitch a quarter of an inch on either side of the drawn line.

Cut on the drawn line.   Repeat for second set.  This makes four HST blocks.

Press seams to one side and trim to a 2 1/2" square.


Sunday 4 February 2018

Time to make quilts for Siblings Together


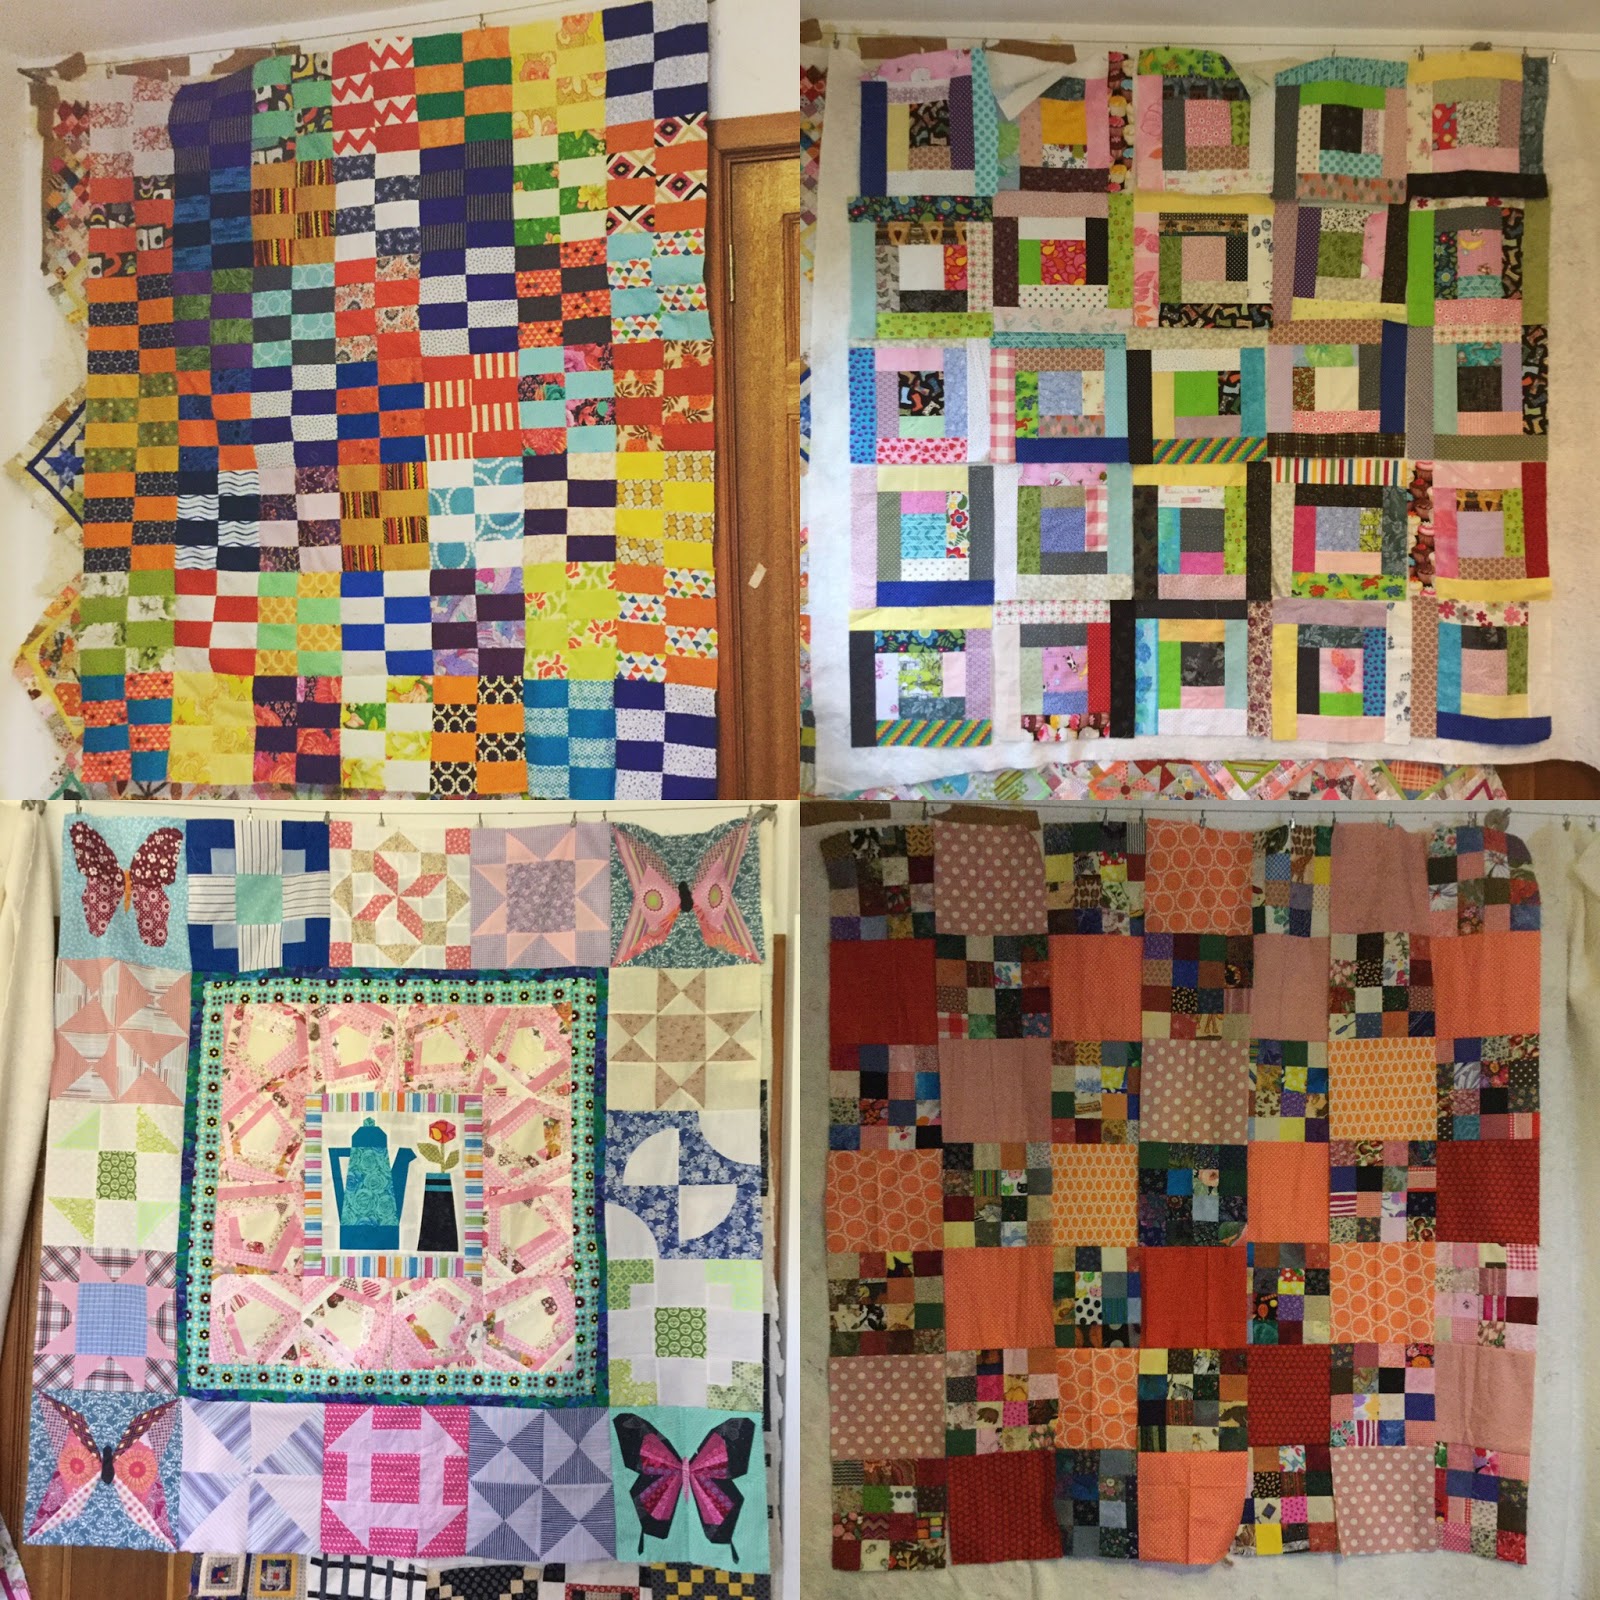
Last year the fabulous quilting community made lots of quilts like these....


....for the charity Siblings Together.  

This charity helps to keep children in the UK care system in touch with their brothers and sisters.  Many children from the same family are not placed with their siblings.  The charity tries to keep the family bonds by reuniting children with their siblings at activity camps in the school holidays.  

Our campaign to make #100quiltsforsiblingstogether provides quilts for the children to take home - a fabulous memory of their experience and a quilty hug from the quilting community.  

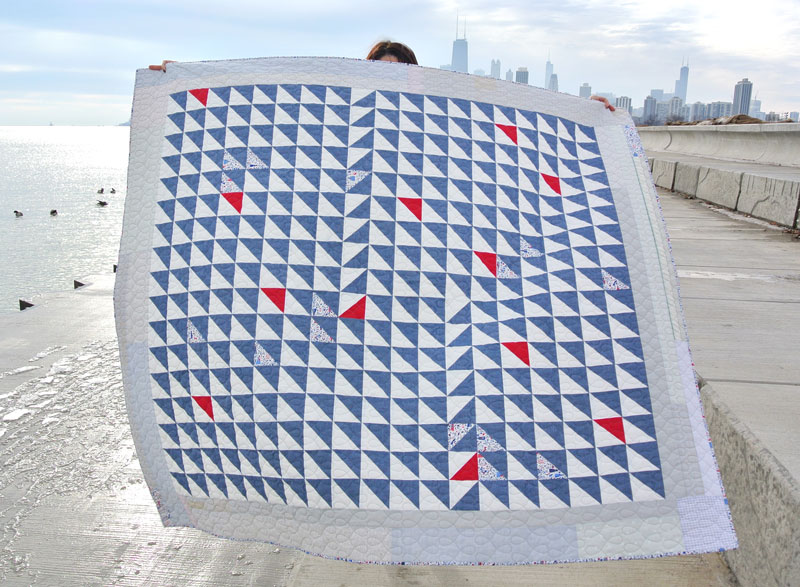
This year I'm hoping you will join me again in the quilt block drive to make quilts like this...


...a new pattern I have designed just for this quilt drive.                                

The quilt is made with two blocks.  

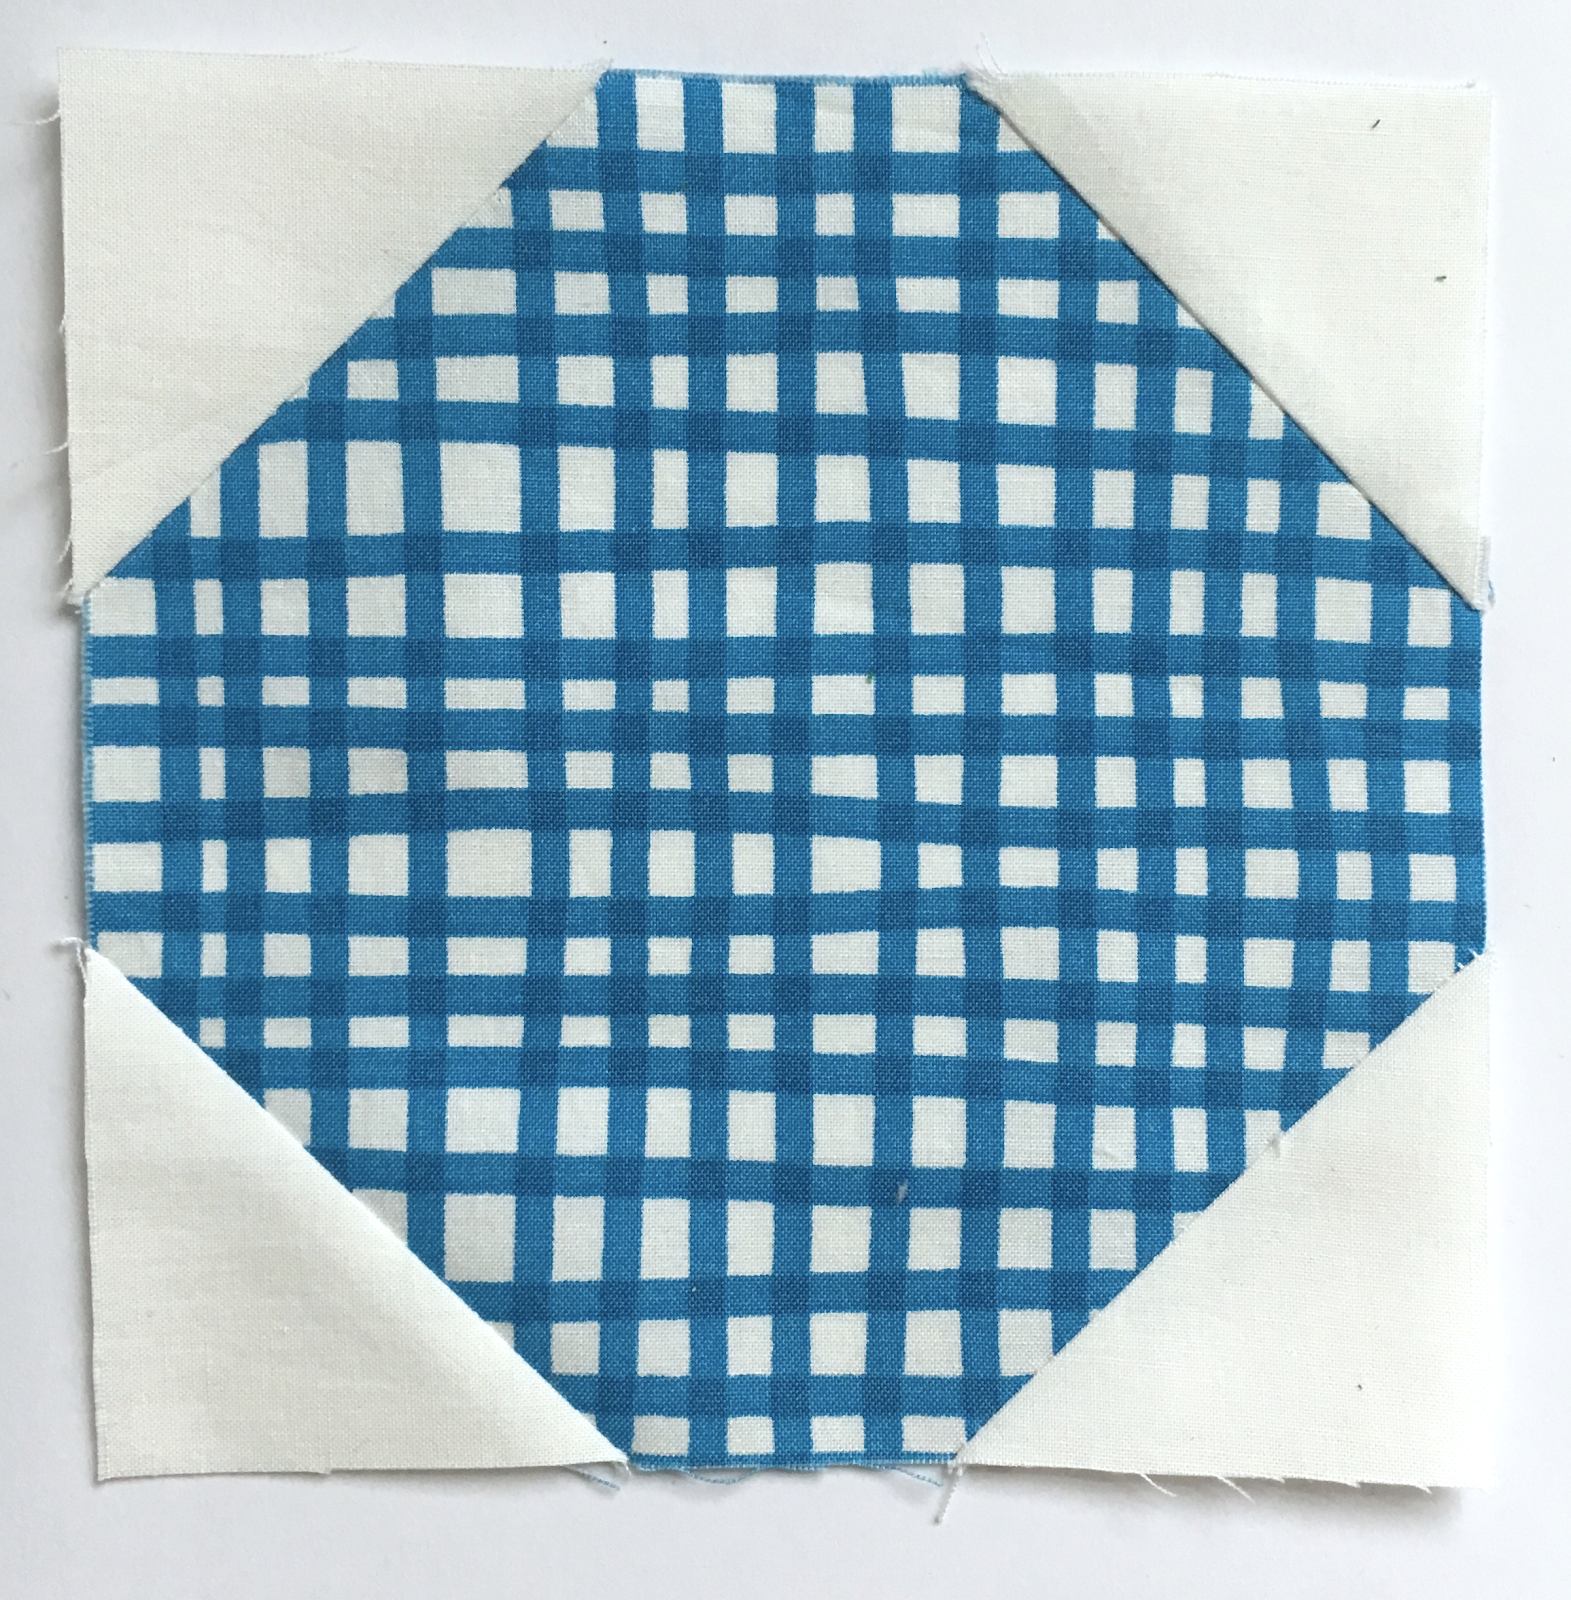
This block, is a great beginner's block, using just HSTs in a colour (aqua in this case) and low volume fabric, to create an arrow head. 


Make four HSTs measuring 6 1/2" (6" finished) using your preferred method.   


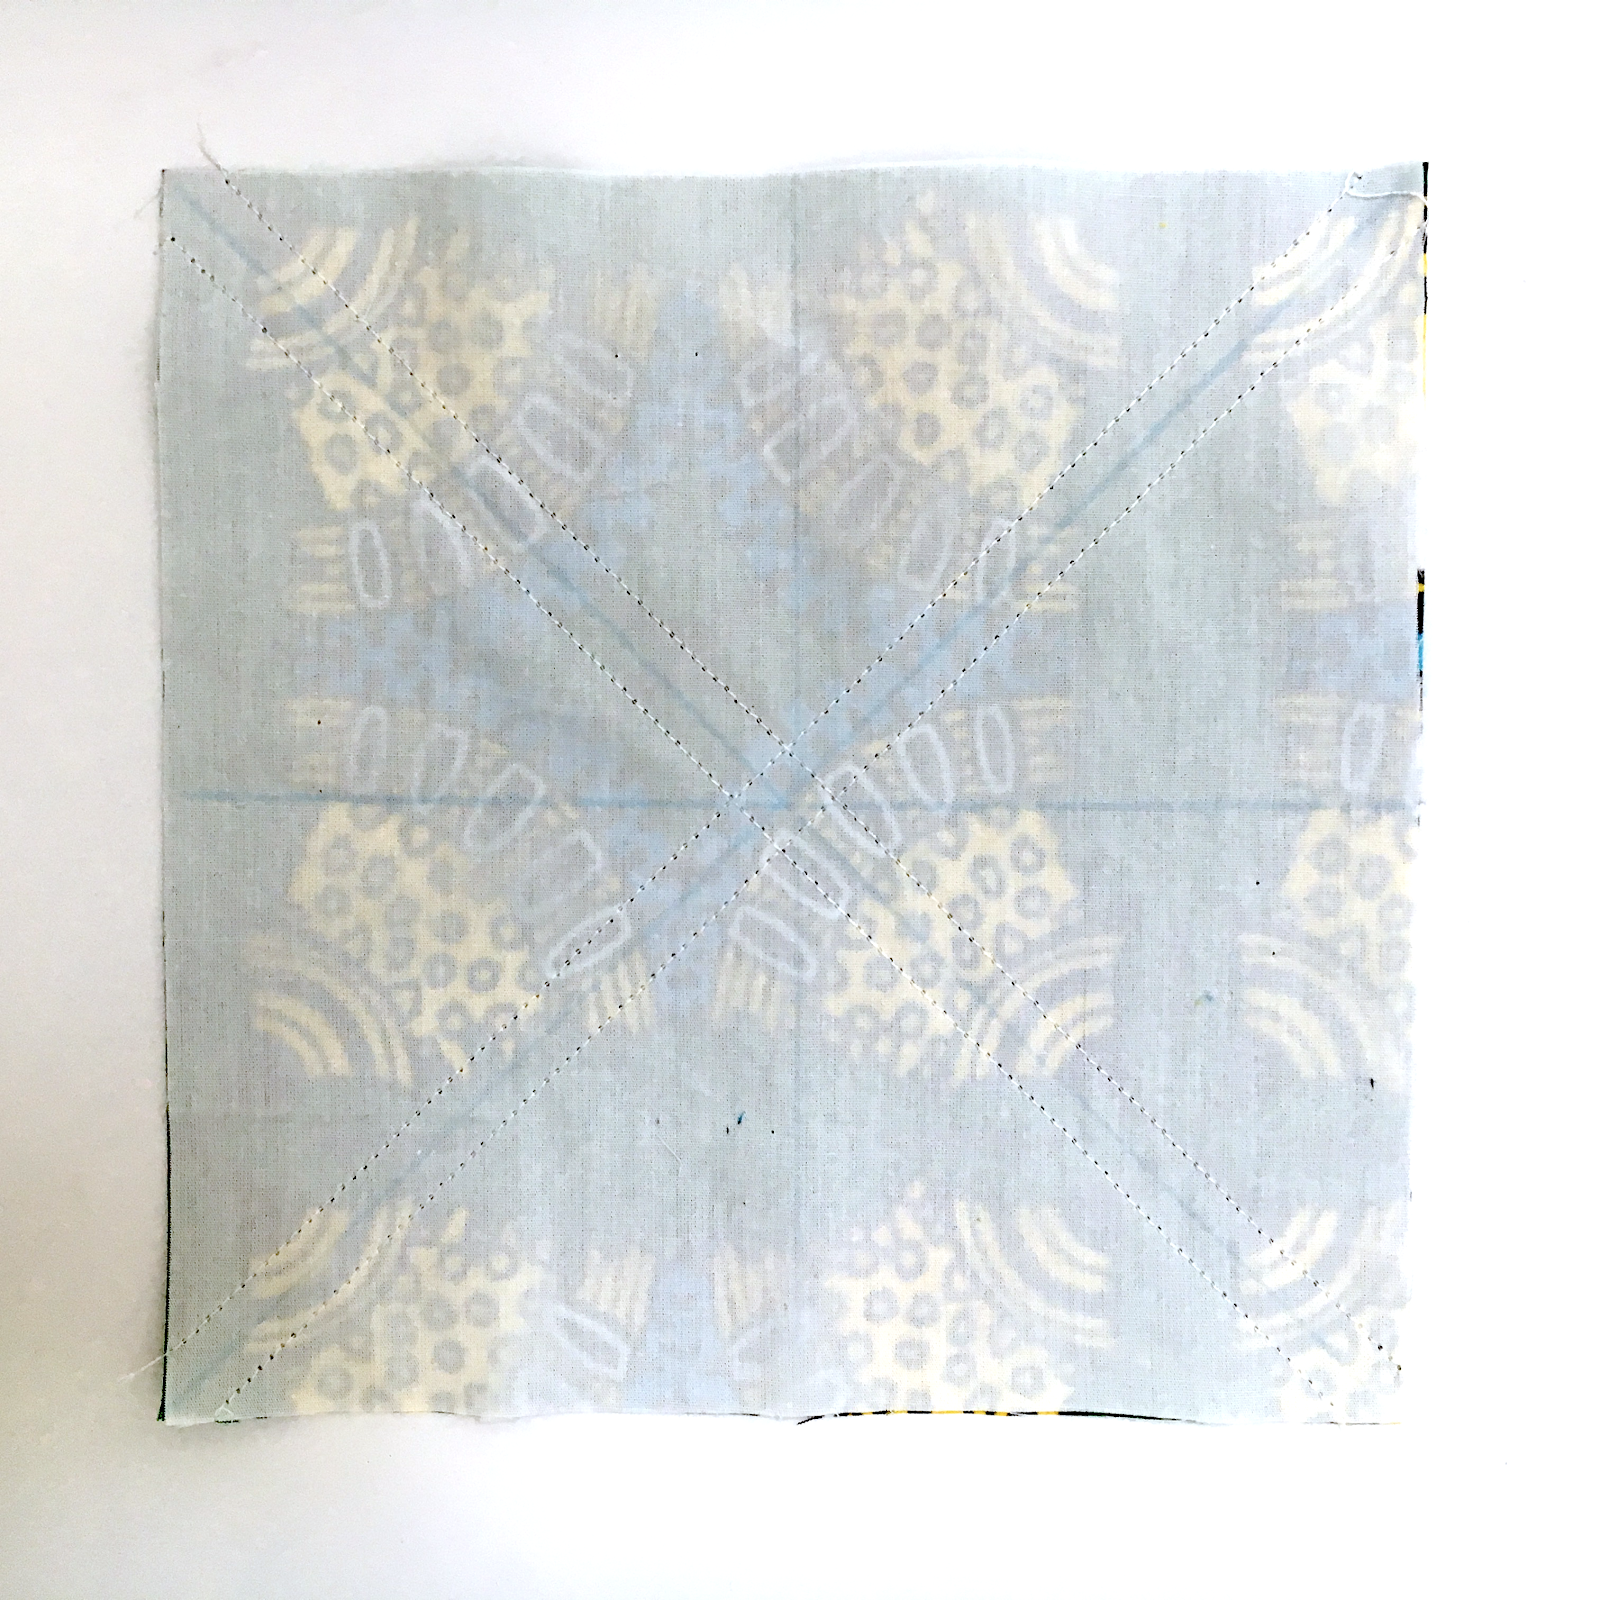
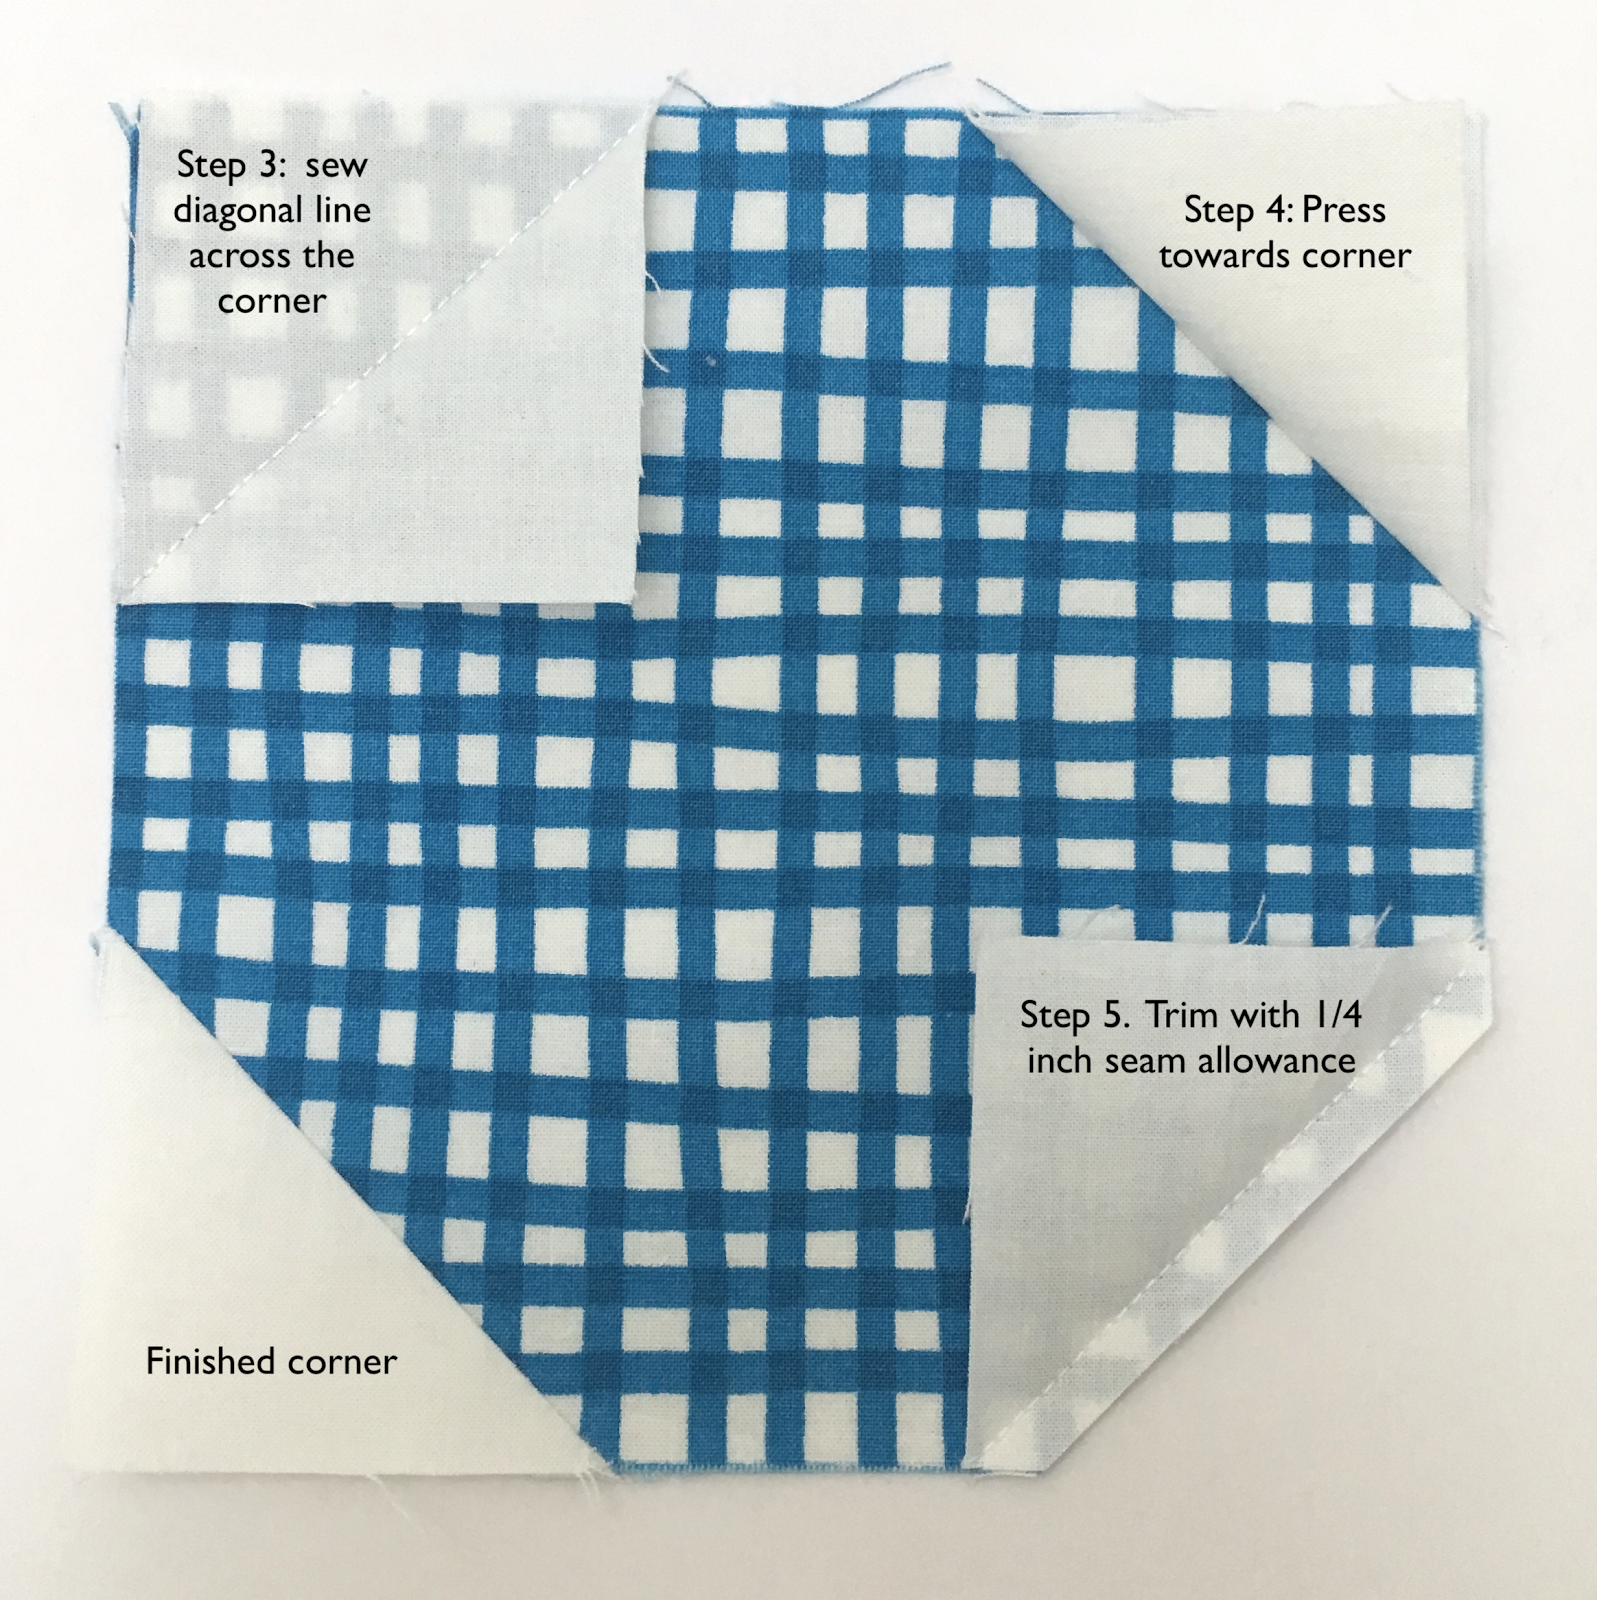
For those new to quilting, take a pair of seven inch squares, one coloured and one low volume, and place them right sides together.

Draw a line across the diagonal of the low volume square and stitch a quarter inch away on both sides of that line. 

Cut along the line and trim both resulting HSTs to 6 1/2" square (6" square finished).  Repeat to yield four in total and stitch together as above.  Your block should measure 12 1/2" square (12" square finished). 


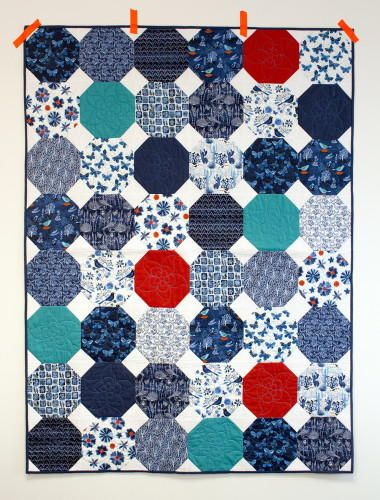
The second block in this quilt, isn't that much harder especially when you foundation piece it!   You can use paper or freezer paper.  I find using freezer paper works better for me and just wanted to share something in return for all the kindness you show in making blocks for the charity.


Here is a link to the pattern which you can download. Please check that your printer is set to print at 100% and NOT fit to page - it makes a difference to the size of your template otherwise.  

And here is how I use freezer paper to make it: 

Print or trace the pattern onto freezer paper and fold along the stitching lines.  

Use the kite template to cut four kite shapes.

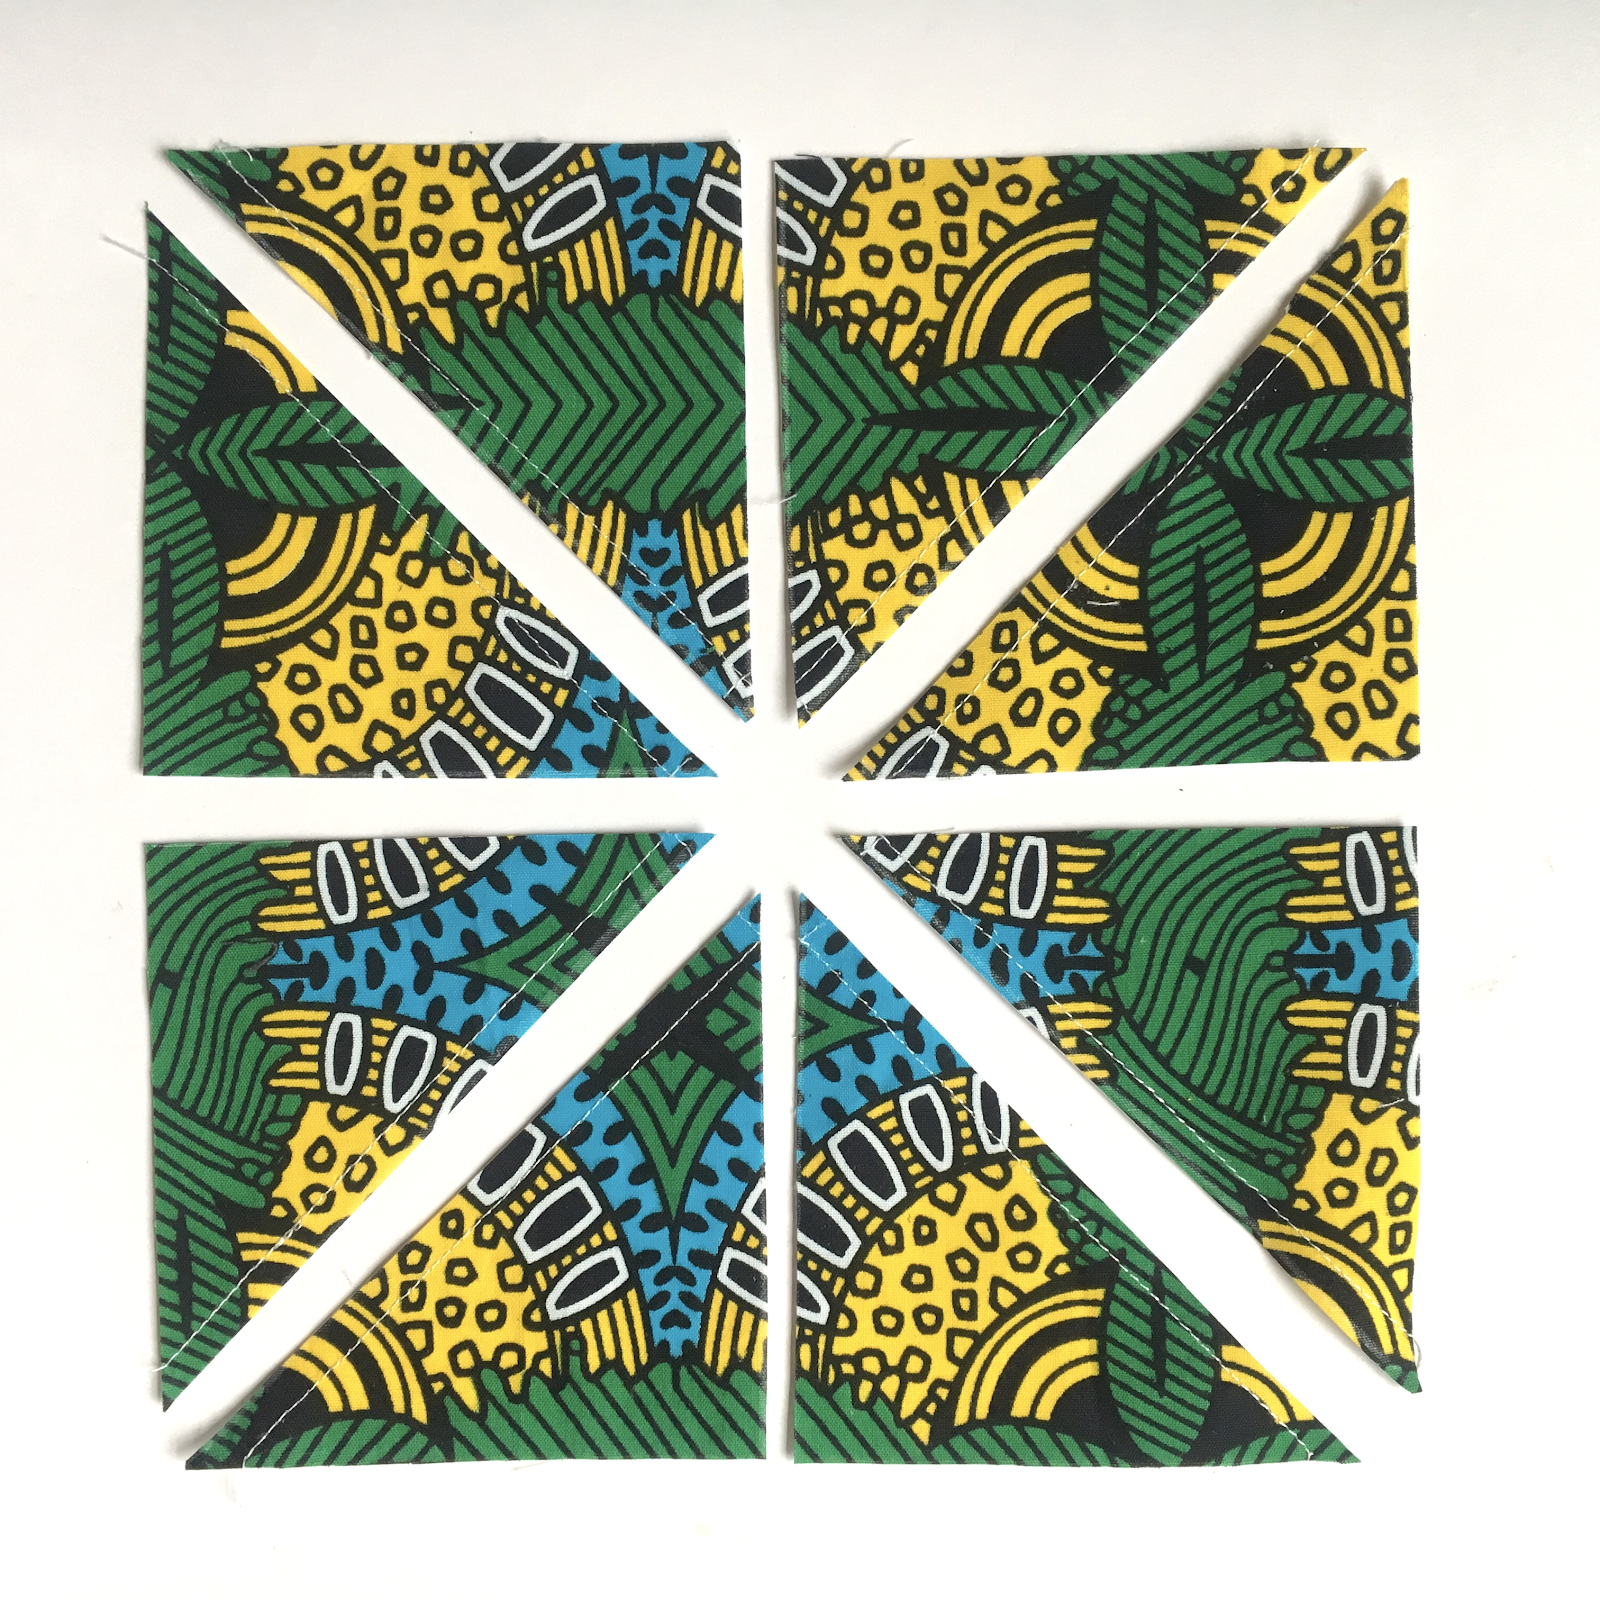
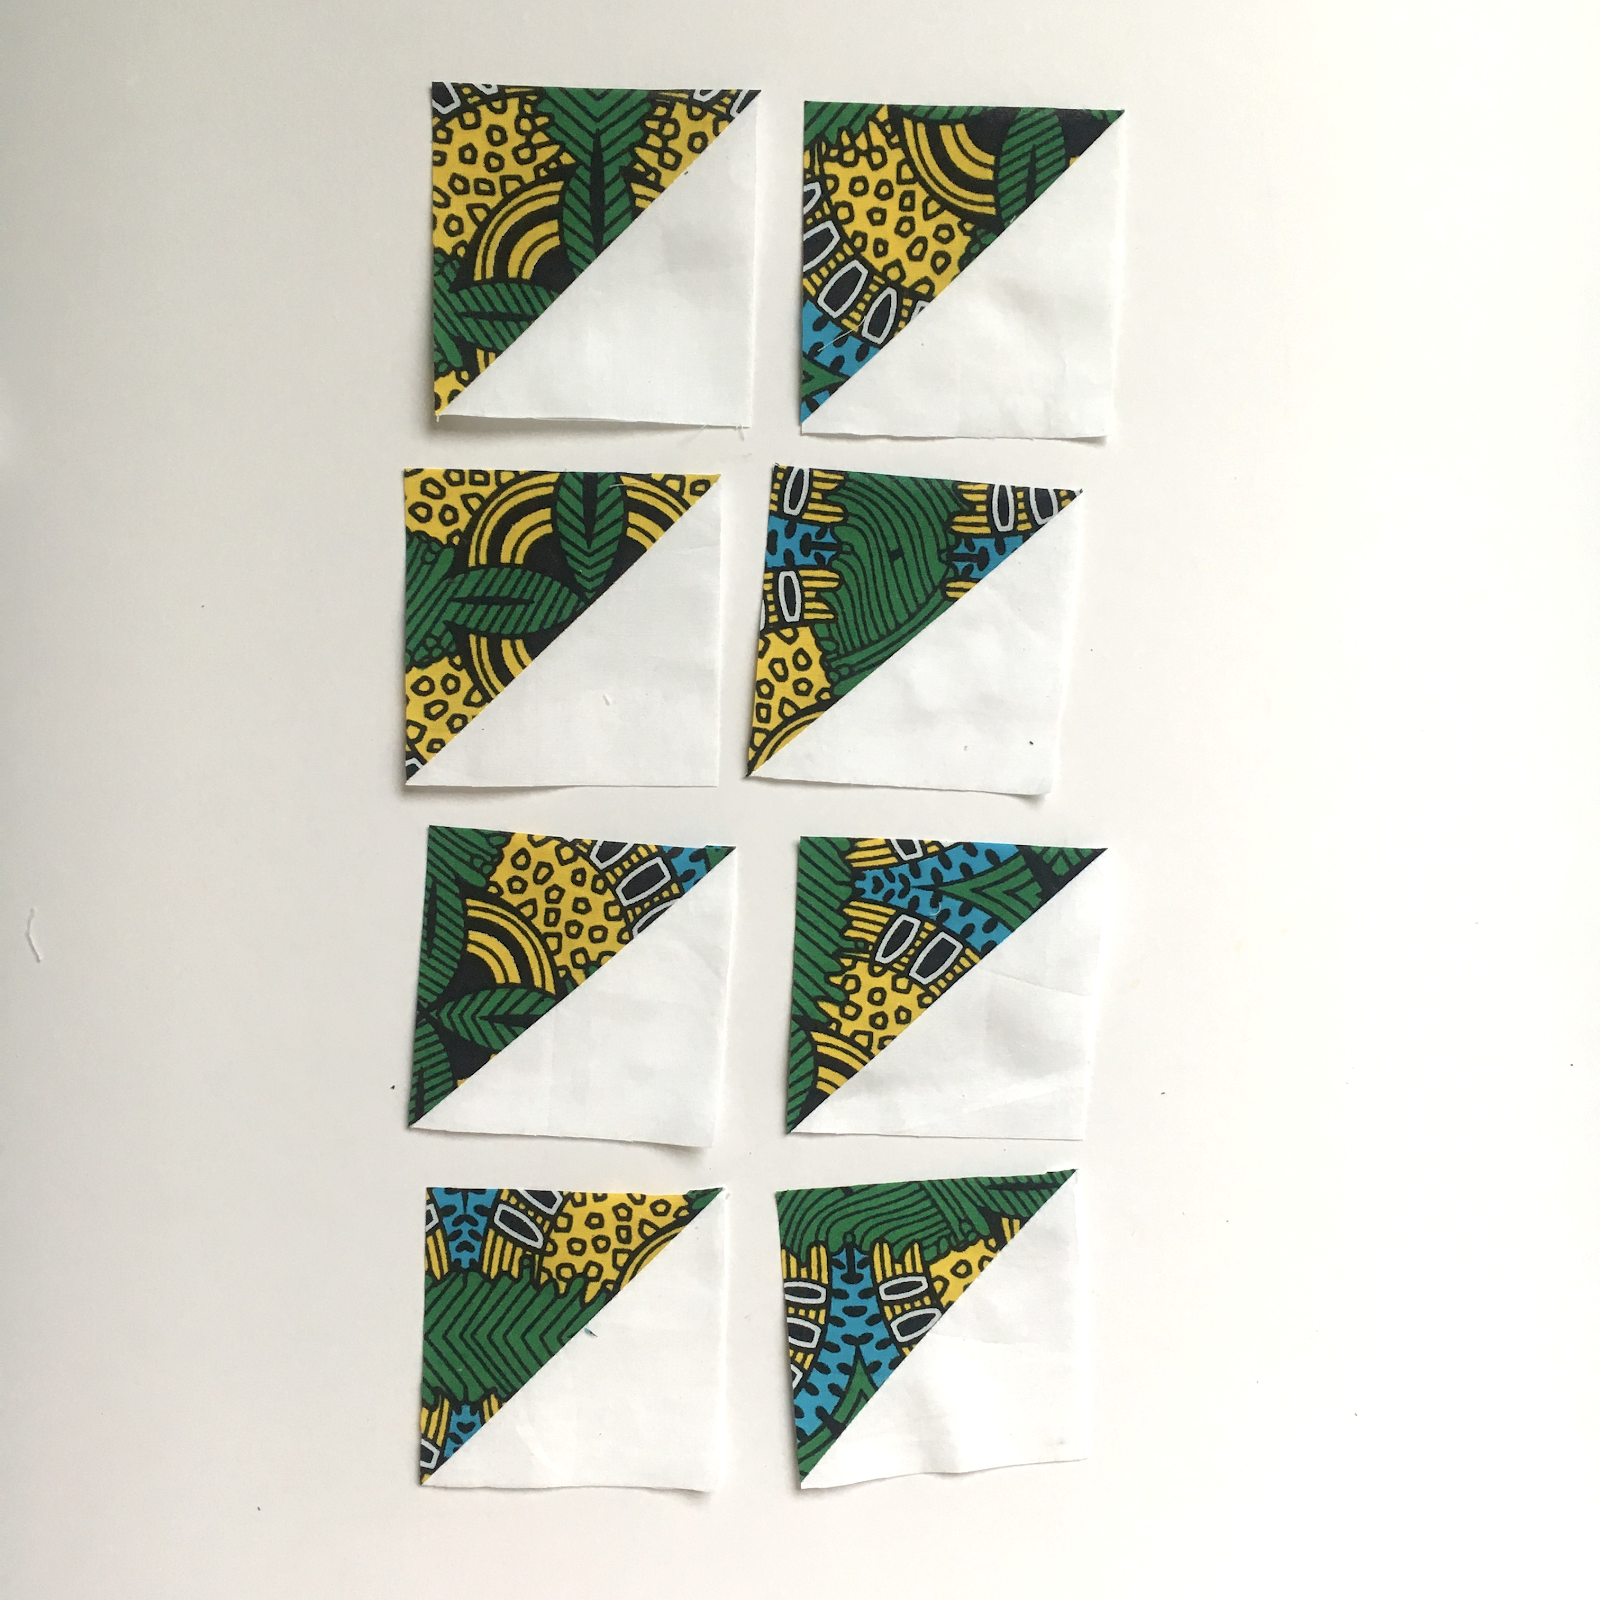
Cut four rectangles from your coloured fabrics, 7 1/2" X 3 1/2".  Pair rectangles, right sides together,  and carefully place your ruler diagonally across the rectangle and cut.  This yields enough side triangles to complete one block.  

You will notice that half the side triangles will fit on the right side of your kite shape and the other half on the left.  Sort them so that you attach the correct triangle.  It is easy to pick up the wrong one! 

Press the kite shape on the freezer paper, making sure the fabric is centred.  

Fold back the freezer paper as previously creased.   With right sides together, align the first side triangle along the edge of the kite.  Stitch along the seam line, as shown in the middle photo above.

Once stitched, fold the fabric onto the freezer paper and press.  Repeat on the other side.  Trim to 6 1/2" square and remove freezer paper pattern and reuse.

Make three further pieced squared, and stitch together as in photo.


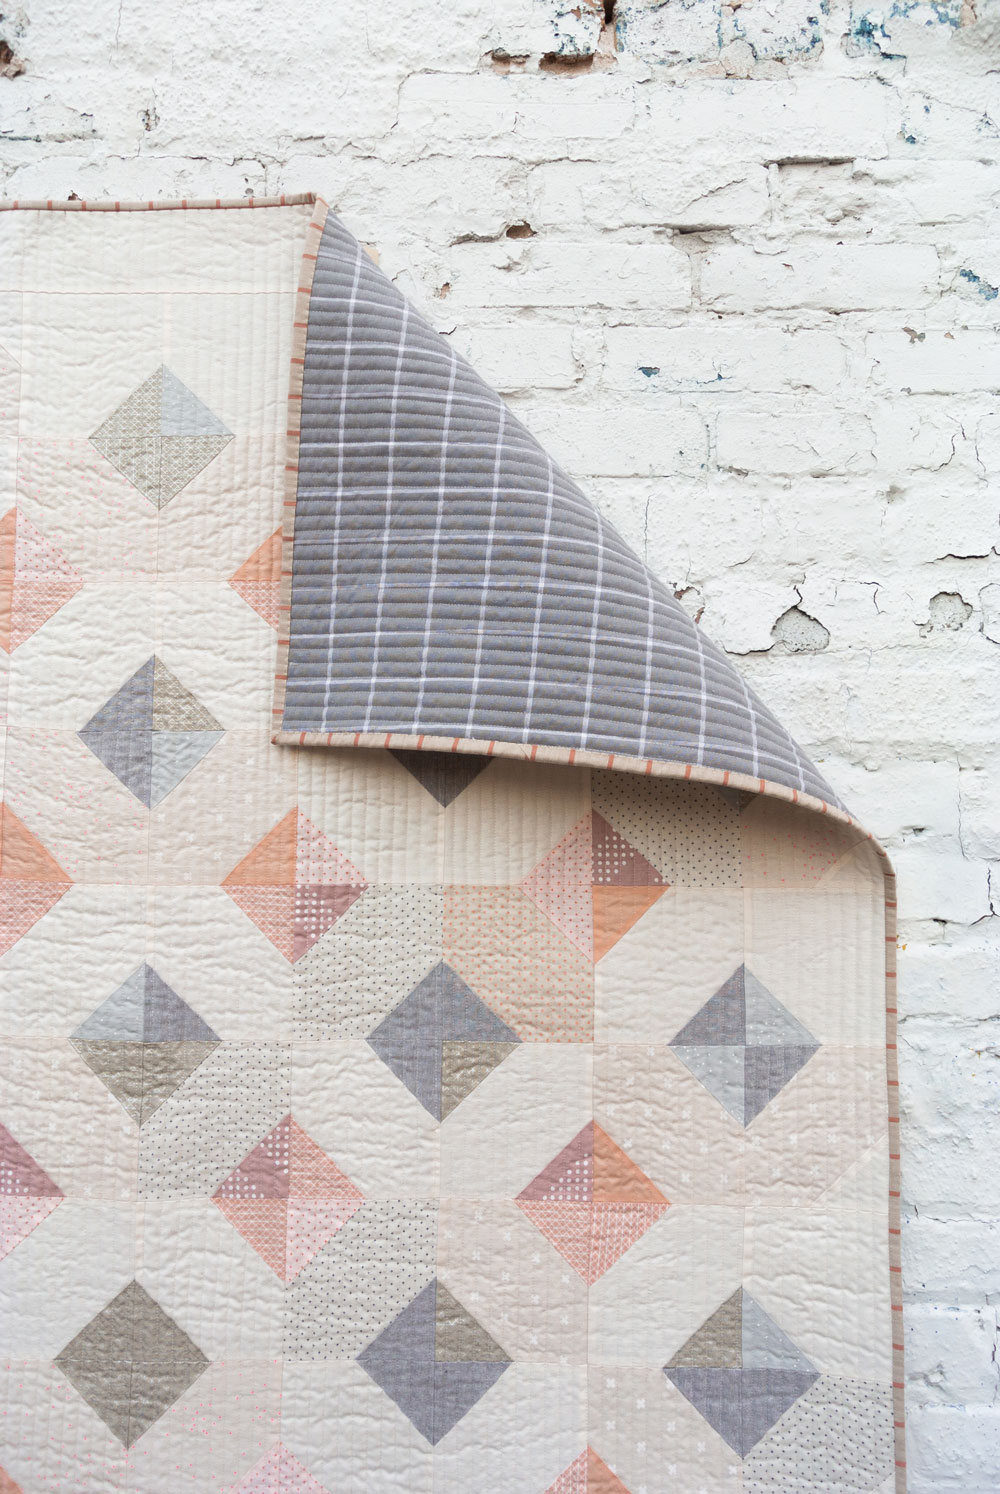
Now you are maybe asking yourselves which colours to use - if you know me you will know my answer is all of them!   Let's see how many different colours we can get through....  


Thanks in advance.  

LinkWithin

Related Posts Plugin for WordPress, Blogger...