Tuesday 28 February 2017

It's Tuesday and that's Scraptastic!

I feel I should get back into writing up my scrappy adventures so will attempt a weekly post here and not just on Scraptastic Tuesday linking up days.

So I have started my Sibling Together campaign for 2017!  I'm not just using my scraps I'm using other people's too!  

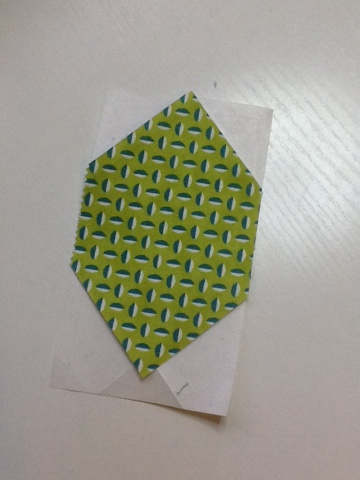
These are the blocks I am asking for this year....that's a shoofly block and one I'm calling a courtyard garden block (I don't know any other name for it).  I have posted instructions for making these here


They make quilts like these.  The first is my trial run and so I used the same blue fabric in the centre, the others are made with donated blocks:


Don't they look different?!  But still similar enough that if we give a quilt to each of the children in a family they will have something tangible that unites them.  It is only a small thing but I hope it will help them inbetween the times when they can be together.

The blocks are very simple, designed that way so anyone and everyone can join in.  

Lots of people are doing just that and I still find it quite wonderful that they do.  I love receiving your squishy packages through the post.  I am squealing with delight on the inside as I don't want to frighten our rather quiet postman nor Maddie the dog, nor provide further proof to the kids of how mad I really am!


Yesterday there was a delivery that didn't fit in our box.


It was this roll of wadding donated by the most lovely Sarah!  She has her hands busy at the moment so is not able to join in with the block making but still wanted to help us make quilts.  Thank you so very much Sarah!

Two years ago when I was making quilts for Siblings Together I used up my own roll of wadding, last year we were makng Quilt As You Go blocks/quilts - I think I will need to wait a while before I take up that method again....!  So this year having a roll of wadding donated is fantastic news!

If you cannot join in making blocks then there are many other ways to help us:

  • donate wadding (this can be pieced Frankenstein style - I found a couple of tutorials on YouTube to help you do this by machine  or by fusible tape )  
  • donate fabric - especially quilt backing
  • donate binding - it is great to have this made for you and scrappy binding is great for the multicoloured block drive quilts 
  •  cheer us on from the sidelines
  • tell other people about the campaign and encourage them to join in!
Or this year I am looking for people to take a quilt top and quilt it - could you be that person?  

These quilt tops don't need anything complicated - simple straight line quilting will look fantastic or you are welcome to try out other overall patterns.   It might be the opportunity you are looking for to practice those quilting skills on your domestic machine or a longarm?  The quilt tops are 60" square and the quilts needs to be finished by July this year 2017.  I can even provide wadding ....and we will pass on any donations of quilt backing we receive.

 Just leave a comment if you can help.  

Tuesday 21 February 2017

Scraptastic Tuesday - February Winners


Hey people it is time to tell you who won the prizes for the February Scraptastic Tuesday link up.

Here are our fabulous Scraptastic Tuesday Sponsors and their buttons, feel free to click through and thank them for their support:


A huge thank you to our generous sponsors for providing the following prizes which have been awarded randomly among those of you who linked up.
Looking forward to next month and hope you will join us on 14th of March.

Monday 20 February 2017

Tutorial - foundation piecing with freezer paper

So I have this love hate thing with foundation piecing ....

And mostly the hate bit wins as I do tend to avoid it if possible - I mean I'd rather hand stitch something than paper piece it.

I always seem to make a mistake or two.   The shorter stitches used mean that it is a lot harder to unpick.  Stitching through paper must blunt my needle.  And then you have to rip the paper off!   It makes a big mess!  

But on the plus side it does make things a whole lot more accurate than without the paper template which is why I would hand piece instead for greater accuracy!

At the thread house retreat I was stitching my own thing instead of joining in Lynne Goldsworthy's paper piecing class but I finished my project quickly and started using her template to make her stunningly beautiful block - but it didn't manage to finish it there.


When I got home I thought I should finish it.  And I did!  I was using fabric received in the retreat goody bag (which was excellent by the way) and raffle ; two charm packs from moda fabrics, mixed bag 2017.

I thought I'd make some more but didn't want to go with paper piecing....so I tried out something a bit different.

I had heard about this technique using freezer paper and here is how it goes...

First trace your pattern onto freezer paper or print it (haven't tried that but several people say it is ok to do)


Now apply the wrong side of your first fabric to the waxy side of your freezer paper pattern using your iron to heat the wax coating.   Then fold back the freezer paper along your seam line and trim your fabric to 1/4" seam allowance.  In this case I am making an irregular hexagon (thanks @archiewonderdog)


Do this on all sides - this will make it easier to line up your next fabric and use the minimum amount.


Check your next piece of fabric is large enough to cover the pattern - in this case the corner triangle and your seam allowance.  Place fabric with right sides together, folding back the freezer paper along the seam line.


With the freezer paper still folded back stitch the seam.   You are using the paper to guide your stitching and NOT stitching on the paper.


Now you fold down the paper and iron to fabric.  


Here is the view from the front...


Repeat for the next piece - front view


View from the back - look no stitching on the paper!  Use the pattern to trim off excess fabric back to the seam allowance.


Here is the final unit all trimmed with the freezer paper pattern still in place


Peel off the freezer paper template and reuse for next piece - I used this freezer paper pattern for each piece like this in the three stars I made this way - that is twelve times!  I made each piece of this star pattern using just two freezer paper patterns then once trimmed the fabric units were easily pieced together as normal with a 1/4" seam and no paper in the way.


Another advantage of this method is that you can press your seams in any direction you like or press them open if you prefer just by peeling the paper back sufficiently to allow this.  Some of these seams  are a bit uppity as I didn't press them enough!


It was quicker for me, less messy, less stressy!  I think I may be beginning a love love relationship with this method of paper piecing.  Have a go and see what you think!

 
If you have any questions just ask and I'll try to make it clearer.  I'm using the same method for this pattern now - who'd have thought I'd be paper piecing so willingly!?


Wednesday 15 February 2017

FAL 2017 - Meet the Hosts - Jess!

Each month we are going to be introducing the hosts of this year's Finish-A-Long so you can get to know a bit more about us! 


I was first up and now it is time to meet the wonderfully talented Jess....


Hi, I'm Jess, otherwise known as Elven Garden Quilts. This is my second year as a FAL host, and although I'm not great at actually participating in the FAL (I have a pretty bad history of not finishing anything on my list!), it's great to be back to cheer you all along for a second year. I thought this was going to be a really hard post to write - but once I got started it was surprisingly easy. So I've inserted photos of some of my favorite quilts in amongst the text - feel free to skim the words if you'd rather just look at quilts ;o).

I'm a 36 year old mum of three not-so-small people - my eldest son (12 year old) started high school this year (grade 7), and I have a 9 year old son and a 6 year old daughter. Needless to say, moments of sewing have been few and far between over the last few months while they've had their summer holidays - but they went back to school last week, so there is some semblance of normality in our household again :o). I have an incredible partner too, who encourages me in all my quilty endeavours and listens patiently when I ramble on about my current projects. We also have two fur babies - Shadow and Pepper, our little quilt-cats, who spend at least 90% of their time asleep on various quilts and cushions around the house! I'll often go back to hand stitch binding and find my quilt has been invaded by cats ;o).


We live in Tasmania, Australia - that little island that sits off the southern coast of mainland Australia. It's a beautiful place to live - we don't have a huge population and we are surrounded by some of the most gorgeous wilderness in the world (in my humble opinion!). I grew up in a pretty arty/crafty family - my Dad studied ceramics at Art School and is an art teacher at a college, and my mum has always been involved with some sort of textile art. She made most of our clothes as kids, and is now obsessed with spinning and knitting all kinds of gorgeous yarn. So it's kinda unsurprising that I've grown up to be a maker.


Although I have a science degree (and work as a lab technician part time), I've always enjoyed making stuff. I started cross stitching when I was quite young, and continued that hobby right through to my university years. It wasn't until I had my youngest child that I decided to get a sewing machine - with the intention of making clothes and toys for my kids. I had fun doing this for a while, but then on a whim I bought a beginner's quilting magazine and that was the beginning of a true obsession. For me, quilting is the perfect marriage of maths and art - I love numbers and I love working with colour, so it's not surprising it has overtaken all of my spare time!


I started quilting around 5 or 6 years ago - and back when I started, my tiny sewing room overlooked the garden - so Elven Garden Quilts was born! After a few years, I outgrew that little room, so my 'studio' is now our garage - not the prettiest location, but I can be as messy as I want (and believe me, the term creative chaos fits me perfectly!) and close the door on it so no one else has to be subjected to it ;o).

I first started blogging for a few reasons. Mainly because I didn't actually know anyone who quilted and I didn't want to bore my family and friends to tears constantly talking about my quilts, and blogging was the perfect way to share what I was making. But it quickly became a way to connect with people all over the world who shared my passion. I'm ever in awe of how supportive and wonderful the online quilting community is, and my life would be very different if I hadn't started blogging. I am a self-taught quilter, thanks to the enormous generosity of so many people in sharing tutorials and ideas, and a love of trying to figure out how to make things work!


I loosely call myself a modern quilter - although I've made plenty of quilts that are far more traditional than modern! I think I'm probably best known for my love of free motion quilting - everything I piece is quilted to death on my domestic Bernina. About three years ago, I was actually invited to become a Bernina Ambassador here in Australia, which is an incredible honour :o). I have several free motion quilting tutorials available on my YouTube channel - and I plan on doing a lot more of these this year! I've been teaching patchwork and quilting classes on a weekly basis for the last three years (although I'm currently having a break, after burning out from a pretty hefty teaching load last year), which is something I absolutely love.


Last year was a big year for me as a quilter, both on a professional and personal level. I won several awards for my quilts at some of our national quilt shows (the Australian Modern Quilt Show and the Australian Machine Quilting Festival), and I taught a lot of classes - both patchwork and free motion quitling. On the personal side of things, I feel like I really grew as a quilter. Although I've always loved making quilts and been happy with the finished product, I've struggled to find my style. But in the last half of last year I feel like I started to find my voice, and started making quilts that are more 'me' than ever before. Although I've always used and loved my design wall, I now rely on it constantly as a tool to design my quilts. Aviatrix is one of the last quilts I made using someone else's pattern - and I think it will be the last for a fairly long time. I'm enjoying doing my own thing so much right now!


The last few quilts I've made (and my current work in progress) all started as a vague idea and a giant pile of fabric, and relied on my design wall to figure out what they would become. You can read all about the process I went through when making Scattered (shown below) herehere, here and here. And if you're attending QuiltCon this year, please go say hi to her - she was juried into the show which is enormously exciting!


I recently wrote about the process of making one of my recent finishes, Flow. Again this quilt started as a pile of fabric and a very vague idea (as in, I knew I wanted to use improv curves), but the design came together through trial and error.


Although I'm much better at starting and finishing projects than I used to be (which isn't to say I don't have any WIPs - there are lots of those!), I work best when don't feel like I *have* to work on a particular project. Which is probably why I make FAL lists and then largely ignore them... Having said that, I have several projects that have been ignored for far too long that I do want to finish this year, so next quarter you can expect me to fully participate and knock over some very long term WIPs!

Thanks for letting me introduce myself (and my quilts!), and I look forward to cheering you all on this year as you work through your FAL lists!

xx Jess


It's the second Tuesday (oops Wednesday for me) of February and that means that the Scraptastic Tuesday link is open. Hope you had a Happy Valentines Day! 

I have been working with some scraps belonging to other people as well as my own to make quilts for the charity I have been supporting for several years now: Siblings Together.  The charity runs holiday camps and weekend activities to keep children in the UK Care System in touch with their siblings,as they are often placed apart from each other.

I have been asking for blocks from two bees as I'm twice Queen Bee this month and have also asked the wonderful quilting community at large to join in.  I am looking to make several versions of this quilt.


In typical TV show fashion here is one I made earlier:


Several blocks have been coming in and a second top is already stitched together in warm colours - red, orange, yellow and a dash of pink.  


Tomorrow I could be putting number three together.  If you feel like joining in there are instructions on making the two different blocks that make this quilt here  

So that's what I'm up to this month - please share your scrappy projects, in progress or completed or your tips for using or organizing your scraps.


Here are our fabulous Scraptastic Tuesday Sponsors and their buttons, feel free to click through and thank them for their support:


A huge thank you to our generous sponsors for providing the following prizes which will be awarded randomly among those of you who link up.
Please join Leanne from She Can Quilt and I by linking up a blog post or flickr or instagram photo sharing a scrappy project, in progress or finished, or your thoughts on dealing with your scrap mountain:
  • You don't have to have joined us before, everyone is welcome.
  • One link per person, and it will be your entry into the random draw for the prizes. It is the same link up here and at Leanne's blog - She Can Quilt - so you only need to link up on one of our blogs.
  • This link is to share with our community about using your scraps, please don't use it to advertise your own products or events.
  • You can link up from your blog, instagram or flickr, but you have to link up to be entered in the prize draw.
  • Please visit at least a few of the links, they are very inspiring, and leave comments too as everyone loves to connect.
  • Use the Scraptastic Tuesday button and invite your friends to join us too. Please share our button, or a link or the hashtag #scraptastictuesday in your linked post or photo.
  • The link is open until next Monday night at 10:00 pm MST. We will announce the winners next Tuesday.
  • If you have trouble linking up, let me or Leanne know and we will get you sorted.
I'm looking forward to seeing what you have to share with us this month.


Thursday 2 February 2017

Fly in the Courtyard quilt

I am Queen Bee twice over this month  - for the Siblings Together Bee and also for the Stitch Tease Bee.  So I decided I would use my worker bees on the same project - a quilt or two for Siblings Together.

In case you don't know about the annual campaign to make 100 quilts for the Siblings Together charity it is all about providing quilts for children in care in the UK.  While in homes or with foster parents, children in care are often placed away from their siblings.  The charity Siblings Together runs weekend activity days and holiday camps so that important sibling bonds are maintained.   The children are referred by their social care team from all over the UK and they receive a quilt or blanket after 6 months of attending the weekend activities or after the camps.   The quilts are great for snuggling when needed and as a memory of times shared and often are one of the very few peronal possessions these children have.

So if you feel inclined and I hope you will it would be great if you could join in by making one, two, either or both of these very simple blocks.   Get in touch with me on my blog or here on Instagram and I'll  you my address to send the blocks.   If you feel really generous you might want to make a whole quilt - either on your own or with a group of friends.  There are also details of amounts required to make all the blocks in the instructins below.


  Alternately, you can also make any quilt you choose, gift any unused quilt you have or donate orphan blocks, wadding, backing fabric, any leftover fabric, binding - if in doubt offer and we will let you know if and how we can use your gift.  This year I don't think I will have as much time to make lots of quilts so I am also looking for people to take a quilt top or blocks and put quilts together.  

Thank you so much for all the help you can give and if you can't give then just cheering on the from the sideline does help tremendously too.


THE FLY IN THE COURTYARD QUILT (or another name if you can think of a better one and I'm sure you can)

So this is the quilt I have designed for this year's quilt drive for Siblings Together.  My trial version is a blue one - see below - but I hope to put several together in different colourways and maybe even some multicoloured ones.  I think it would look great in orange, or red, or purple - in fact there are a few clourways at the bottom of the page.

I designed it as charm square friendly to minimise some of the cutting but it can be cut from any piece of fabric.  The blocks are simple and quick to piece together. 

They should measure 12 1/2" unfinished.  The quilt is 60" square.


Shoo fly block for each block:

Cut 5" squares  - two Low Volume and two coloured.   This produces four HSTs, which should be trimmed to 4 1/2" squares.   

For variety in my test quilt which is all blue/white I used four different blue prints in each block, making enough HSTs for two blocks.  You can use two different prints however and place them diagonally opposite each other.

Cut 4 1/2" squares - four Low Volume and one dark coloured


This is a nine patch block.  Arrange as in the diagram below.


To complete a quilt make 13 shoo fly blocks in total which requires: 

26 x coloured (I used charm squares) and 26 Low Volume 5" squares
52 x 4 1/2"  squares in Low Volume, 13 in dark colour


Courtyard Garden block for each block:

Select four coloured prints.  All the same color.

Cut 4 1/2" x 2 1/2" rectangles - four coloured - one in each print
2 1/2" squares - four coloured - one in each print, four in Low Volume


Stitch the small squares together and attach to the rectangle in the same print as in the diagram - make four of these units, one in each print:


Cut 4 1/2" squares - four in Low Volume and one dark coloured

This is another nine patch block.  Stitch together as in the diagram below, with the pieced unit placed so the coloured section is on the outside edge:


 To complete a quilt make 12 blocks in total which requires:


48 x 4 1/2" x 2 1/2" coloured rectangles 
48 x 2 1/2" coloured squares 

48 x 2 1/2" squares in Low Volume
48 x 4 1/2" squares in Low Volume

12 x 4 1/2" dark coloured squares  

Here are a few colourways I have played around with on EQ but I am sure there are lots of other options, please help me make some of them:


LinkWithin

Related Posts Plugin for WordPress, Blogger...