Tuesday, 12 July 2016

Scraptastic Tuesday - July Link Up


Scraptastic Tuesday


I would love to be able to say I have been working on something scrappy but to be honest I haven't!  

The end of school term always seems to be a frantic rush and I have been doing my headless chicken act lurching from one thing I need to do to the next - not much sewing involved sadly.  I need a list of tasks and to calmly tick them off one by one!  But that is not happning..... yet.

I have been remembering that in 2015 I made a Scraptastic Tuesday Sampler from some of my Liberty fabrics - I do so love this quilt! I mixed Liberty fabric with solids and prints.  It feels lovely and is a light and cosy quilt.  I did a mix of machine ditch quilting around the blocks and some bigstitch hand quilting with cotton perle.  I should get it out and use it as it is perfect for a cool summer!


The cutting instructions/tutorials for the blocks in this quilt are on the Scraptastic Tuesday Sampler page above. (I have prettied this page up a bit though I still have three blocks to write about - almost there!)


So what I have been doing is thinking I need to start another Scraptastic Sampler....for 2016!

I have been playing with EQ and have come up with this desgn.


Lots of HSTs, QSTs and dark scrummy colours lightened with a bit of off white.  This time there are five different blocks, which will all be the same size, (12" finished) alternating with a plain square, and on point. Putting squares on point does mess up the eventual size of the quilt but I will add borders to make it up to 80" square.


If you fancy joining in I will do some proper tutorials this time.  I already have a new page drafted, but not published, to list my tutorials.  I will be thinking about a schedule next and will need to buy my grey background fabric!  EQ is telling me I need 4 5/8 yards.      

I am getting a bit excited about this one!


But now as it's the second Tuesday of July, the Scraptastic Tuesday monthly link is open below. It is time for you to share your scrappy projects, plans and ideas. First, our fantastic sponsors:


A huge thank you to our generous sponsors for providing the following prizes which will be awarded randomly among those of you who link up.

Please join Leanne from She Can Quilt and I by linking up a blog post or flickr or instagram photo sharing a scrappy project, in progress or finished, or your thoughts on dealing with your scrap mountain:
  • You don't have to have joined us before, everyone is welcome.
  • One link per person, and it will be your entry into the random draw for the prizes. It is the same link up here and at Leanne's blog - She Can Quilt - so you only need to link up on one of our blogs.
  • This link is to share with our community about using your scraps, please don't use it to advertise your own products or events.
  • You can link up from your blog, instagram or flickr, but you have to link up to be entered in the prize draw.
  • Please visit at least a few of the links, they are very inspiring, and leave comments too as everyone loves to connect. 
  • Use the Scraptastic Tuesday button and invite your friends to join us too. Please share our button, or a link or the hashtag #scraptastictuesday in your linked post or photo. 
The link is open until next Monday night at 10:00 pm MST. We will announce the winners next Tuesday. 
If you have trouble linking up, let me or Leanne know and we will get you sorted. 


Friday, 8 July 2016

Finish-A-Long 2016 Quarter Three - is your list ready to link up?


Here we are - already facing the THIRD quarter of 2016....can you believe it? 

This means 2016 is half way over!!! As you are already aware, the 2016 FAL has gone global - a community of bloggers across the world, jointly hosting the FAL. Our hosts are:
For those of you who are new to the FAL, it is a place to find motivation and encouragement to complete those unfinished projects that are hanging about becoming UFOs. 

Every quarter you post a list of projects you hope to finish in the next three months, and then at the end of the quarter, you post a link from your blog, Flickr or Instagram of each successful finish from your original list. Each finish is an entry for wonderful prizes from our sponsors. There is no penalty for not finishing a listed project, so feel free to make your list long or short, as you wish. 

The 2016 Schedule and Rules for the FAL are on my permanent FAL page All you need to know about Finish Along 2016, let me know if you have any questions. Here are the fantastic and generous sponsors for Q3 of the FAL - you can see each of their prizes listed under their logo (think about visiting them and saying thank you): 

 
As you may recall from the previous quarters, there was a return of tutorial week at the end of each quarter, between the opening of the link for finishes and the day that link closes. Are you enjoying this? Please share your thoughts in the comments section below! 

This will take place each quarter. Each host works hard to put these together so I hope you are visiting their blogs to encourage them. If you have a tutorial that you would like to share, please let me or another host know. 

 It's time to round up those projects you want to finish over the next three months, take a photo of where you are now, and make your list. Please ensure that you have at least started your projects - pulled fabric with a pattern or plan, and remember that it is finished projects that will get you entry toward the above listed prizes. So while we love to see your bee blocks, the "finish" is when they are a completed, usable project. 

It is very helpful if you tag your Q3 list as #FALQ3yourname. 

The 2016 Q3 link for your list of proposed finishes is now open below on my blog and on each of the hosting blogs. You only link your list once, on one blog - and that link will show up on all of the blogs. 

 If you are using Flickr or Instgram, link a mosaic and put your list in the description. Katy of The Littlest Thistle has a great tutorial on how to link-up if you have need it. 

We also ask that you become part of the FAL community. Please check out the links of others and visit and comment on their lists. We all need encouragement to get those finishes done, so please share some of your own too. 

 When creating your list there is one thing to remember....No deductions for not completing something so ..... Aim High! Nothing to lose!!! Well Now..... Get those lists together and get linked up. 

The Q3 linky party will stay open until 11 pm EST, July 16th - as we are global, you might want to check your time zone to determine your last possible time to link. Remember: you only need to link up on ONE hosting blog and it will automatically show up on all hosting blogs.


Thursday, 30 June 2016

Cover a Box Tutorial

Hello and welcome to my blog.

 If you are visiting for the first time feel free to have a look around though I'm more often to be found now on Instagram (almost daily and sometimes several times in the day).  

Today I want to share my tutorial to cover a box for the Finish-A-Long tutorial week.

I have these cardboard boxes left over from feeding the cat!  They used to hold sachets of cat food, but I find them useful to store scraps: bonus HSTs, squares, triangles and other bits that are leftover from other projects.  But they do not look that attractive, do they?

I did cover one ages ago and fully expected to cover all of them.   They are much prettier that way I think and help to keep my sewing room tidy!


Here is how I did it...and just in case you have a different sized box I have not made it specific to my box measurements.

First measure your box:

1. Measure across the front and one side of your box.  Now add 1/2" for your seam allowance.   This is measurement A.


2. Measure from the top edge, down around the bottom and up the other side.  Now add 1/2" for your seam allowance.  This is measurement B.  (My tape measure is hooked over the top edge on the side you cannot see.)


You need to cut two rectangles of fabric measuring A" x B", one for the outer and one for the lining.  

My measurements, (which include the seam allowance) worked out as 12" X 15 1/2" so that is the size of my rectangles.


The outer cover
Fold your rectangle in half, with right sides together,  match one side A edge to the other.  Stitch both side seams of the outer cover.


Check the box fits snuggly inside the outer cover.   

If it doesn't, make adjustments to your side seams until it does.  Line up the side seams with the middle of the sides of your box.  


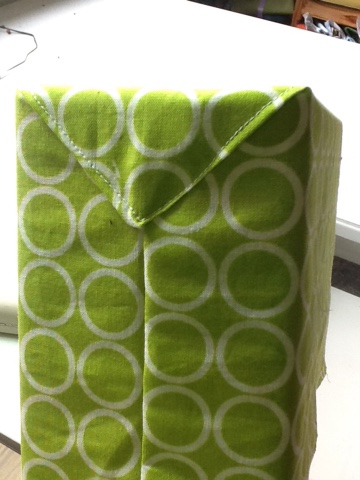
Smooth out the triangle flaps on both sides at the bottom of your box.  Fold the triangles up the side of the box and crease along the edge of your box. 


Remove the box and pin the triangle flap to the side of the outer cover and stitch in place.  I have turned my box upside down in this photo below to show my stitching.


In case you are wondering why I chose to do this, folding the flap up the sides of the box ensures the bottom of your box will stay smooth increasing stability.   I also think it makes a nice feature. 

Press under 1/4" seam allowance to the top edge of your outer cover.

Handles 
 
If you wish to add handles to your box, cut two 5" lengths of braid.  Fold the braid in half and pin in place on the outer cover, centring the middle of your braid with the side seam.   Stitch in place to the top edge of your outer cover, within the seam allowance, so your machine stitching will not show when you finish your box.  


The lining

 Fold your lining rectangle in half, with right sides together,  match one side A to the other, as before.   Stitch both side seams of the lining.  

Mark the triangle flaps on your lining as before, making a crease which will box the corners of your lining.   This time stitch along the crease as shown in the photo.


  Trim the excess off.  


Turn under your 1/4" seam allowance to the top edge of your lining as you did before with the outer cover.


Finishing

 Fit the box inside the outer cover and the lining inside the box, as shown in the photo.  The outer cover seam allowance on the top edge should be folded over the edge of the box to the inside and the lining should be lined up to the edge, the seam allowance folded under.  Hold both lining and outer cover in place with clips.  Tuck the raw edge of the braid handle to the inside and clip in place.


Hand stitch around the edge of the box.  It only took a few minutes!  Or alternatively you could glue in place.


And ta da !  Here is the finished covered box!  


Fill up with scraps or whatever you choose! Here are three together ...


For the orange version I used a quilted outer panel.   I made it slightly larger than my measurements to allow for a bit of shrinkage due to the quilting.  In all other respects the process was the same as above.  It is a great way to practice machine quilting on a small scale and uses up scraps of wadding.


I hope this will help you organise your sewing spaces and make it pretty with your favourite fabrics.  I am hoping to have a whole rainbow of boxes soon.   
Please share photos of your covered boxes with me using the hashtag #nickyscoveredbox as I'd love to see what you do with this idea. They might also make great presents when filled with something crafty for a friend.  

The link up of FAL finishes closes tomorrow, Thursday 7th July.  The following day, Friday 8th July, the link up for your new list for quarter three of the 2016 Finish-A-Long will open, closing on 16th July.  

Remember you can only win prizes at the end of quarter three if you first link up your list of proposed finishes.  

I think I will add a few of these boxes to my list and a whole lot more besides I'm sure!


Update: 


I have now covered more boxes, with a bit of a change.  One with a contrast fabric around the top edge of the box (a), one with a pieced strip around the top edge of the box and one with a contrast fabric on the short ends of the box (b).


Variation (a) I have added a contrast fabric strip round the top edge of my box by adding 'A' length strips to my rectangle and reducing the 'B' length to compenate but adding in my seam allowance.  

For example:
My original rectangle was 12" x 15 1/2"  

I added two 2 1/2" x 12" wide contrast strips, so my main fabric was reduced to 12" x 10 1/2".  Otherwise construction was the same.

Variation (b) To add a contrast fabric to the short sides of my box I added a fabric strip by adding 'B' length strips to my rectangle, and compensating as before.

For example:
My original rectangle was 12" x 15 1/2"  


I added two 2 1/2" x 15 1/2" wide contrast strips, so my main fabric was reduced to 7 1/2" x 15 1/2".  Otherwise construction was the same.


I am already thinking of other alternatives, including fussy cut strips around the top, pockets on the outside or even in the lining, divisions inside the box and I'm sure there are more that could be added.

LinkWithin

Related Posts Plugin for WordPress, Blogger...