Tuesday, 26 April 2016

A butterfly medallion!


Scraptastic Tuesday


I started this project with this trial block made from scrappy bits!


And potentially these...


I thought the butterfly would work as a medallion centre and added a simple frame around it - and wondered about a border of propeller blocks using the orphan one I had as a starter


The propeller border was soon finished.


After such a busy border I thought something more open would be a good contrast.

I have oodles of scrap triangles from making other blocks and thought they would suggest small butterflies scooting round the centre in a fluttery cloud !


I placed them at all sorts of angles and liked it!  Only problem was piecing it that way...


So I started piecing it improv style 


First section of this border completed!   But I couldn't leave it there though it did take me a few days and a final push from my friend Helen/Archie on IG!

Here it is complete with x+ cornerstones, fluttery borders and a final scrappy 2 1/2" square border and I'm rather pleased with it!


Who knew it could turn out so well? 

Update :   I sorted that naughty cornerstone and put it firmly in it's place as I couldn't stand it being so forward!


All is well with this quilt top !  Sigh.

Further update:

It is quilted now, mainly in the ditch except where the butterflies are.  
  The central butterfly has a small meander and the little butterflies have a large meander to suffer their flight paths. 


 The quilt is backed with some fabric from Sarah and Jude and it is bound in a scrappy binding.


I am rather pleased with how this quilt turned out.


I will be linking this project to the Finish-A-Long 2016 at the end of quarter 2


Finish A Long 2016

The butterfly centre and orphan propeller and x+ blocks are on my Quarter 2 list here

Monday, 25 April 2016

Finishing small things 3


On my finish along list for quarter two I have a mosaic of small projects.  


This project is number 11.

I entered a swap on IG last year and made a Star Wars themed package for my partner.


A practice piece was left over - a stitchy R2D2.  I felt it should become something so ordered a bit of Star Wars fabric from Frumble Fabric, as you do....


And it quickly became storage for charm squares.  It was made with four rectangles, and a square bottom.  I used car headliner as the stiffener and is works like a dream. (Tip received from Di @wllowbeckdesigns).  As this is a techno style project I left the material visible on the inside and finished of the raw edges with a bit of wide ribbon hand stitched in place, which was the longest bit of the project!


It's full already!  And looking out at me from my fabric shelves - much prettier than the cardboard shoe box it replaced.  I might have to make a few more...


I will be linking this project to the Finish-A-Long 2016 at the end of quarter 2


Finish A Long 2016

This R2D2 charm square basket is on my Quarter 2 list here


Sunday, 24 April 2016

Finishing small things 2: the robins!


On my finish along list for quarter two I have a mosaic of small projects.  


Like buses, robins come three projects at a time - see number 17!


This is how these projects began


And this is how they became something else.  

The three robins became the tote bag I had intended from the start.  

It is a simple unlined canvas bag, with some raw edged machine applique on it!

I have enclosed the raw seams, on the sides and bottom, with another line of stitching beyond those raw edges - a sort of reverse French seam I think (with a real French seam the lumpy bit would be on the inside!)    I added a contrast brown binding to the top edge enclosing the handles too. 

I made the handles by doubling over and stitching down some woven tape and stuffing the tube it made with wadding scrap so my handles will not cut into my hand/shoulder.  


I have even taken it to Tesco's with me and it has kept those bulky bread and breakfast related items together in my trolley and car boot! Not so heavy it might bust my stitches and clean!  Success!


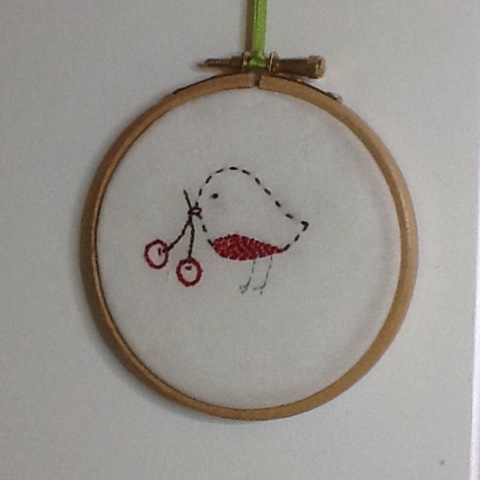
The one wee embroidered robin from a Fat Quarterly Retreat class in 2012 with Aneela Hoey finally became the picture it was always meant to be...


I just finished a few threads and mounted it in this cute wee embroidery hoop and hung it with a contrast green loop of ribbon.  I finished the back (not shown) with a circle of felt, hand stitched in place.

It is now up on the wall of my sewing room.

And finally the other raw edged robin (made at the same time as the three robins on canvas) became a Christmas cushion.    I teamed him up with a mini charm border, some hand quilted cross hatching in cotton perle and some Essex linen on the back.  A simple envelope closure for the finish.  

I'm rather in love with him so it is still on the chair where I took a photo of it.


And here they are all together


I will be linking this project to the Finish-A-Long 2016 at the end of quarter 2


Finish A Long 2016

This trio of robin related projects is on my Quarter 2 list here

Saturday, 23 April 2016

Finishing small things 1

On my finish along list for quarter two I have a mosaic of small projects.  


This is the first one I tackled...no 10!


It is a screen print I bought from the lovely Emily @lovestrawberrypatch.  From the start I had intended to make it into a sewing machine cover. 

I paired it up with a couple of schoolhouse blocks I didn't use in my school house quilt - later dubbed Konaville because I was using it as a colour chart of Kona colours as those tiny squares you get on the commercial ones really aren't big enough are they?   Of course it is out of date already...but I really love this quilt.


And this is how my sewing machine cover finished up.   


Screen print side!


School house side - those upside down doors still make me smile!   A symptom of my crazy upside down life perhaps ?  

The cover is sized for use on my table, with the machine recessed, so will be a bit on the short side if it were sitting on top of the table.   But this is how it sits normally though I have to admit the cover doesn't stay on for long!  

I will be linking this project to the Finish-A-Long 2016 at the end of quarter 2


Finish A Long 2016

This sewing machine cover is on my Quarter 2 list here

Tuesday, 19 April 2016

Scraptastic Tuesday winners in April


Scraptastic Tuesday

My scrappy hexy, square and triangle from last week have been handed over to my lovely Stingy bee mate Catherine,  who will add a square and a triangle before passing the lot onto Di in July.  

I have carried on scrapping this week...

At the end of last quarter I couldn't find these blocks,  which I received in a swap about three years ago!  (It is still going on here on Flickr, now with a colour theme for the outer square, in case you want to join in - it would be a great way to make this quilt with lots of variety!)  


I had been thinking I would just put them together to make a quick wall hanging before that FAL deadline.


And now I'm really glad I only found them recently, when looking for something else!  Isn't that always the way?

I quickly made about 20 more and was planning to carry on till I had a quilt full. 


Then I was considering different layouts, which would mean I could make fewer, and posted on IG about adding an alternate square which would mean a quicker finish - only about 80 more to make....still a lot right?  


Rainbow colours were mentioned so I started organising the blocks in their outer square colours on a diagonal line!  Next I added a wonky little snowball block using a whole heap of scrappy triangles - off cuts from making other blocks (really scrappy right?)  Loved it but not enough to make eighty more blocks.

I decided I had made enough and went for a modern look with just 41 blocks and lots of negative space.  A real 'less is more feel'!  

It all came together like this!  


I think you can see all those cute fussy cut economy blocks so much better with this arrangement and so I have another quilt top ready for quilting for #siblingstogether.  I hope some youngster will have fun looking at all those strange little snippet squares without thinking it too babyish...

More about the campaign to make 100 quilts for Siblings Together can be found here.


In the meantime,  let us thank our lovely sponsors, and award the prizes for the April Scraptastic Tuesday Link.


A huge thank you to our generous sponsors for providing the following prizes which will be awarded randomly among those of you who link up.
We will be emailing all of the winners shortly. Thank you for sharing your April scrappy inspiration and please plan to join Leanne from She Can Quilt and I again on the second Tuesday in May 10 - for the next Scraptastic Tuesday link.

By the way, if you are looking for some scrappy inspiration, a visit to the links is worth your time.

Clamshells residue

I've been playing with some leftovers from cutting out my scrappy clamshell quilt.  Using my sizzix die to cut those clamshells left me with two almost quarter circles for each clamshell.  Well I couldn't throw them away now could I?


Four made an ovoid shape which I trimmed by putting them back through my sizzix with a circle die this time. 


 I quickly had lots of multi scrappy circles.  


I decided to apply them to charm squares I cut from leftover backing from other quilts (this is a truly scrappy project).   


Normally I'm a needle turning appliqué sort of person but I wanted robustness and quickness so I tried out a technique using interfacing.

I cut circles of interfacing using the sizzix machine.   Stitched them sticky side to the right side of my pieced circle.   Carefully I slit the interfacing, clipped the curves around the outside edge of the circle and turned it right side out.  The sticky side now faces outwards and can be pressed with an iron onto the centre of my 5" square to attach it.  


I started top stitching them but I'm not sure I like it.   I'll try stitching them on when I get to the quilting stage - hope they hold till then as I stitch all the squares together.  Or I might go back to my comfort zone of needle turning.

This could take a little while to complete whichever way I continue as I am planning on using 121 in this quilt, giving me an 11 x 11 block layout with a border possibly to hold it all together.  

I may even have enough for another quilt...? One or both will be heading towards my favourite charity Siblings Together - you can find out more about the campaign to make 100 quilts for Siblings Together here!


LinkWithin

Related Posts Plugin for WordPress, Blogger...