Having entered two quilts into last year's festival of quilts and having seen some of the community quilts there I started hatching a plot for Siblings Together Quilt Group to join in the fun!
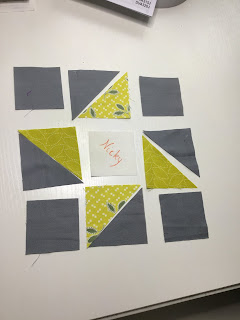
Make four 2 1/2" HST (half square triangles) in your preferred method - they can all be made from two fabrics (star and background) or be scrappy but best if the stars points are all in a similar colour and background fabrics too so the star will stand out.
In my example below I have used all the same solid for the background and the star triangles in two fabrics

Press the seam allowance in alternate directions in each row to nest those seam allowances when joining rows.
The finished block - from the front
from the back...
Just contact me Nicky Eglinton on IG or nickyeglinton@aol.com for my address and I hope to see you at Festival of Quilts in front of our quilt!
How to make the HST blocks:
It is scary putting your work out there but both my quilts were joint ventures so I was not alone and I thought that would be an excellent way for others to put their work forward.
So here is my idea - I am the mama for the January #miniquiltdrive for the #100quiltsforsiblingstogether campaign. So instead of asking for lots of blocks I am looking for just ONE 6" finished Friendship Star block from everyone who has ever been involved in making quilts for Siblings Together. Whatever you have done and whenever it was I'd love as many of us to be represented in this quilt.
I hope you would all love to join in - in fact I'm counting on it! It will be a very small quilt otherwise.
You may have seen my photos on Instagram
Here is the tutorial:
Cut five 2 1/2" squares - one is the centre square in a light colour.
Please write your first name on this centre square in a pen that will not wash out. Let's make it easy to read so not your most undecipherable signature!
Tip: I did this before any sewing so I was happy with the result and didn't have to unsew due to unsightly wiggles - if you don't like your writing you can ask someone else to or send to me if you don't have a suitable pen, just make sure I know who you are!!
The other four 2 1/2" squares are the background, which can either be light or dark as seen below.
In my example below I have used all the same solid for the background and the star triangles in two fabrics
Assemble all HSTs and squares in a nine patch as shown above or you can spin that star the other way if you prefer - I am looking for a mixture of dark/light backgrounds and clockwise and anti-clockwise spinning stars!


Stitch the squares together in each row.

Press the seam allowance in alternate directions in each row to nest those seam allowances when joining rows.
Just contact me Nicky Eglinton on IG or nickyeglinton@aol.com for my address and I hope to see you at Festival of Quilts in front of our quilt!
How to make the HST blocks:
Cut four 3" squares - two in background fabrics, two in star fabrics.
Draw a diagonal line across the back of the squares. Pair up a background with a star fabric, right sides facing. Stitch a quarter of an inch on either side of the drawn line.
Cut on the drawn line. Repeat for second set. This makes four HST blocks.
Press seams to one side and trim to a 2 1/2" square.


